While going through the full article will give you a crisp understanding of the steps to install and use SR-IOV, you can take a short-cut approach and just follow these steps, or even just use the manifests from these sections:
Virtualized workloads, whether containers, pods, or virtual machines, need to communicate with other applications and workloads In a Kubernetes cluster, the primary Networking Plugin being used (such as OVN, Cilium, Calico etc.) provides a single virtual interface to a Pod, generally referred to as the primary Container Networking Interface (or “primary CNI”). The primary CNI is meant to offer connectivity, but is not expected to provide line rate performance. In the case of OpenShift, the primary CNI uses Open Virtual Switch (OVS) which, despite its efficient performance, is still not comparable to the performance of a physical interface. For achieving line rate performance, the physical interfaces from the hardware server can be passed to the Pod - a process known as PCI-passthrough, since these interfaces are inherited by the Pod as PCIe devices. PCI-passthrough gives the Pod the ability to utilize the interfaces with performance as if the Pod’s container was an application running on the physical host. However, this methodology presents a challenge - there may be dozens of pods running concurrently on a physical Kubernetes node, and the number of physical networking interfaces on a node is ofcourse limited. When PCI-passthrough allocates an interface to a Pod (essentially by moving that interface into the Pod’s container’s linux namespace), said interface is no longer available to other Pods or applications running on that server.
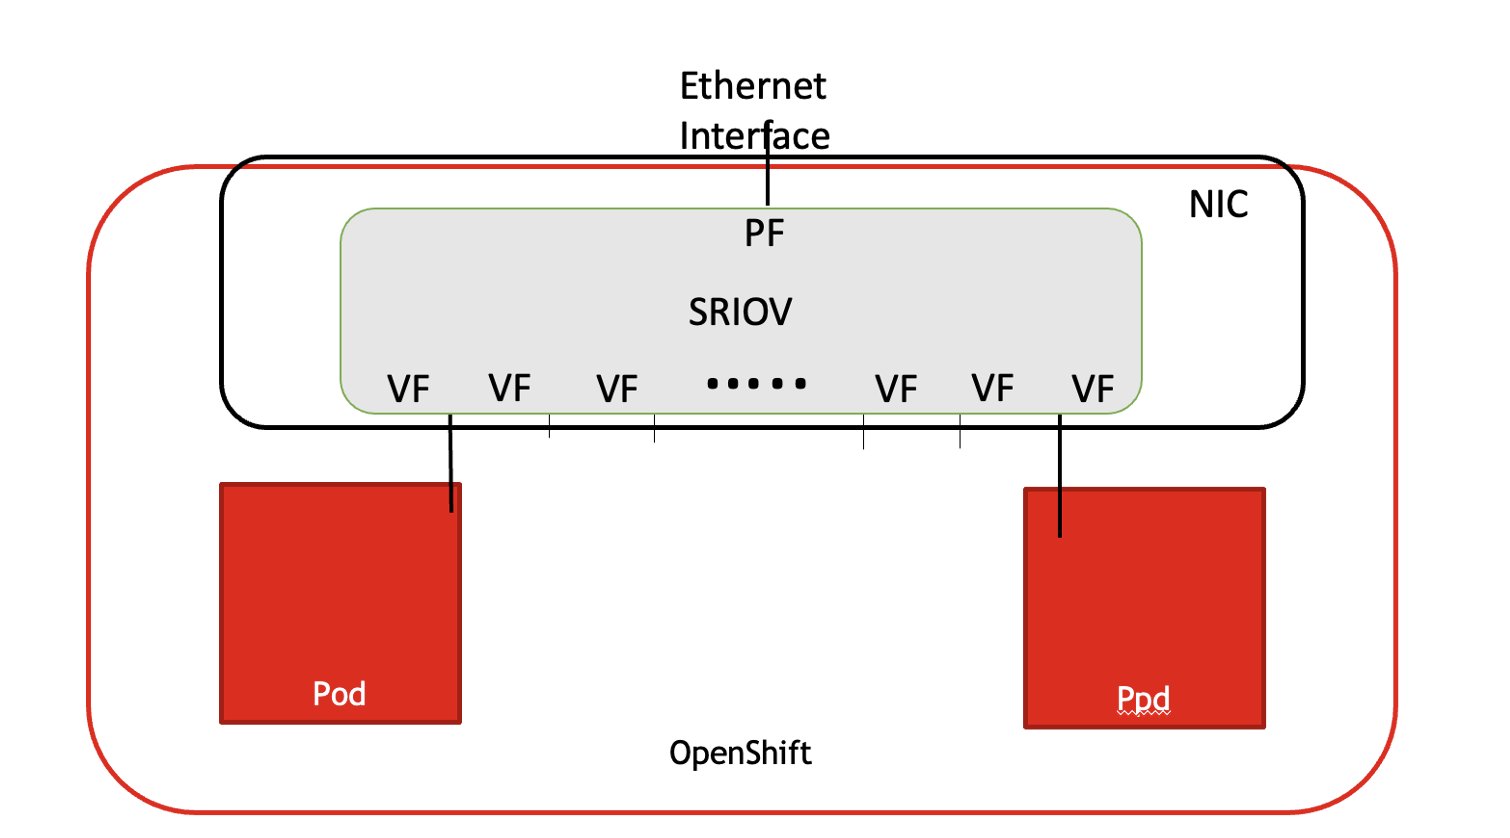
Single Root Input/Output Virtualization (SR-IOV) addresses this challenge. SR-IOV enables a networking interface to be offered as multiple virtual interfaces to Pods. In SR-IOV jargon, the physical interface is referred to as Physical Function (PF), while the virtual interfaces created as result of using SR-IOV are referred to as Virtual Functions (VFs).
A PF is essentially a PCIe Networking device representation created by SR-IOV . Using SR-IOV capability, multiple VFs can be created for a given PF. These VFs are lightweight PCIe functions that can now be passed to the Pod (or virtual machine) as if they are actual PCIe devices. In reality, these VF are using resources, such as queues and registers, on the PF while pretending to be a real physical interface.
Note: that the SR-IOV capabilities may need to be explicitly enabled in BIOS settings for the Network Interface Card (NIC) this interface belongs to.
In a nutshell, SR-IOV provides the means to create multiple interfaces (in the form of VF) using a single physical interface (PF), and then pass these VF to the Pod using PCI-passthrough. The Pod can then load the appropriate drivers on these VF to achieve near-native performance. The following figure offers a visual representation of this concept:
This article demonstrates how SR-IOV capabilities can be enabled and used on an OpenShift cluster.
The OpenShift SR-IOV Operator:
The Single-Root I/O Virtualization (SR-IOV) Operator is among the validated Red Hat Operators available through the OpenShift marketplace. The operator initializes the SR-IOV enabled Network Interface Cards (NIC) on the cluster nodes by provisioning the correct plugin/drivers. Additionally, it allows creation of Network Attachment Definitions (a standard Kubernetes Resource to connect to networking devices) for the SR-IOV created VF. The SR-IOV plugin also defines the Custom Resources for configuring and managing SR-IOV interfaces - specifically, it creates the CRDs “SriovNetwork”, “SriovNetworkNodeState”, and “SriovNetworkNodePolicy”.
To verify if your OpenShift Cluster is able to see the latest operator version available through marketplace, try the following:
$ oc get packagemanifests.packages.operators.coreos.com -n openshift-marketplace sriov-network-operator
NAME                     CATALOG             AGE
sriov-network-operator   Red Hat Operators   23h
The steps to Install the SR-IOV Operator is not any different than installing other OpenShift Operators. The three steps that are required are the following:
1) Create a namespace that will be used by the operator:
$ oc get csv -n openshift-sriov-network-operator -o custom-columns=Name:.metadata.name,Phase:.status.phase
Name                                      	Phase
sriov-network-operator.v4.13.0-202306070816   Installing
Verify that the installation is successful:
$ oc get csv -n openshift-sriov-network-operator -o custom-columns=Name:.metadata.name,Phase:.status.phase
Name                                      	Phase
sriov-network-operator.v4.13.0-202306070816   Succeeded
Drain or not to Drain?:
To ensure that the changes by any SR-IOV changes properly get applied to all the pods on a node, SR-IOV by default drains a node whenever reconfigured. This safety latch is not applicable, however, for SNO clusters - as there is no other node to drain the workloads to. So in case of SNO, its good practice to disable this SR-IOV behavior using the following configuration change:
Successful installation of the SR-IOV operator results in creation a resource type “SriovNetworkNodeState '' which lists all the SR-IOV capable interfaces on each of the nodes. The status of this CRD is important to determine if the host nodes (or its interfaces) support SR-IOV. The output should look something like the following:
$ oc get SriovNetworkNodeState -n openshift-sriov-network-operator  -o custom-columns=Name:{.metadata.name},Interfaces:{.status.interfaces[*].name}
Name                    Interfaces
sno-145.jnpr.bos2.lab   eno12399,eno12409,ens6f0,ens6f1,ens5f0,ens5f1,ens4f0,ens4f1,ens7f0,ens7f1
If a server doesn’t have SR-IOV capable interfaces, the output will reflect that as shown here:
$ oc get SriovNetworkNodeState -n openshift-sriov-network-operator  -o custom-columns=Name:{.metadata.name},Interfaces:{.status.interfaces[*].name}
Name                                        Interfaces
ip-10-0-246-29.us-east-2.compute.internal
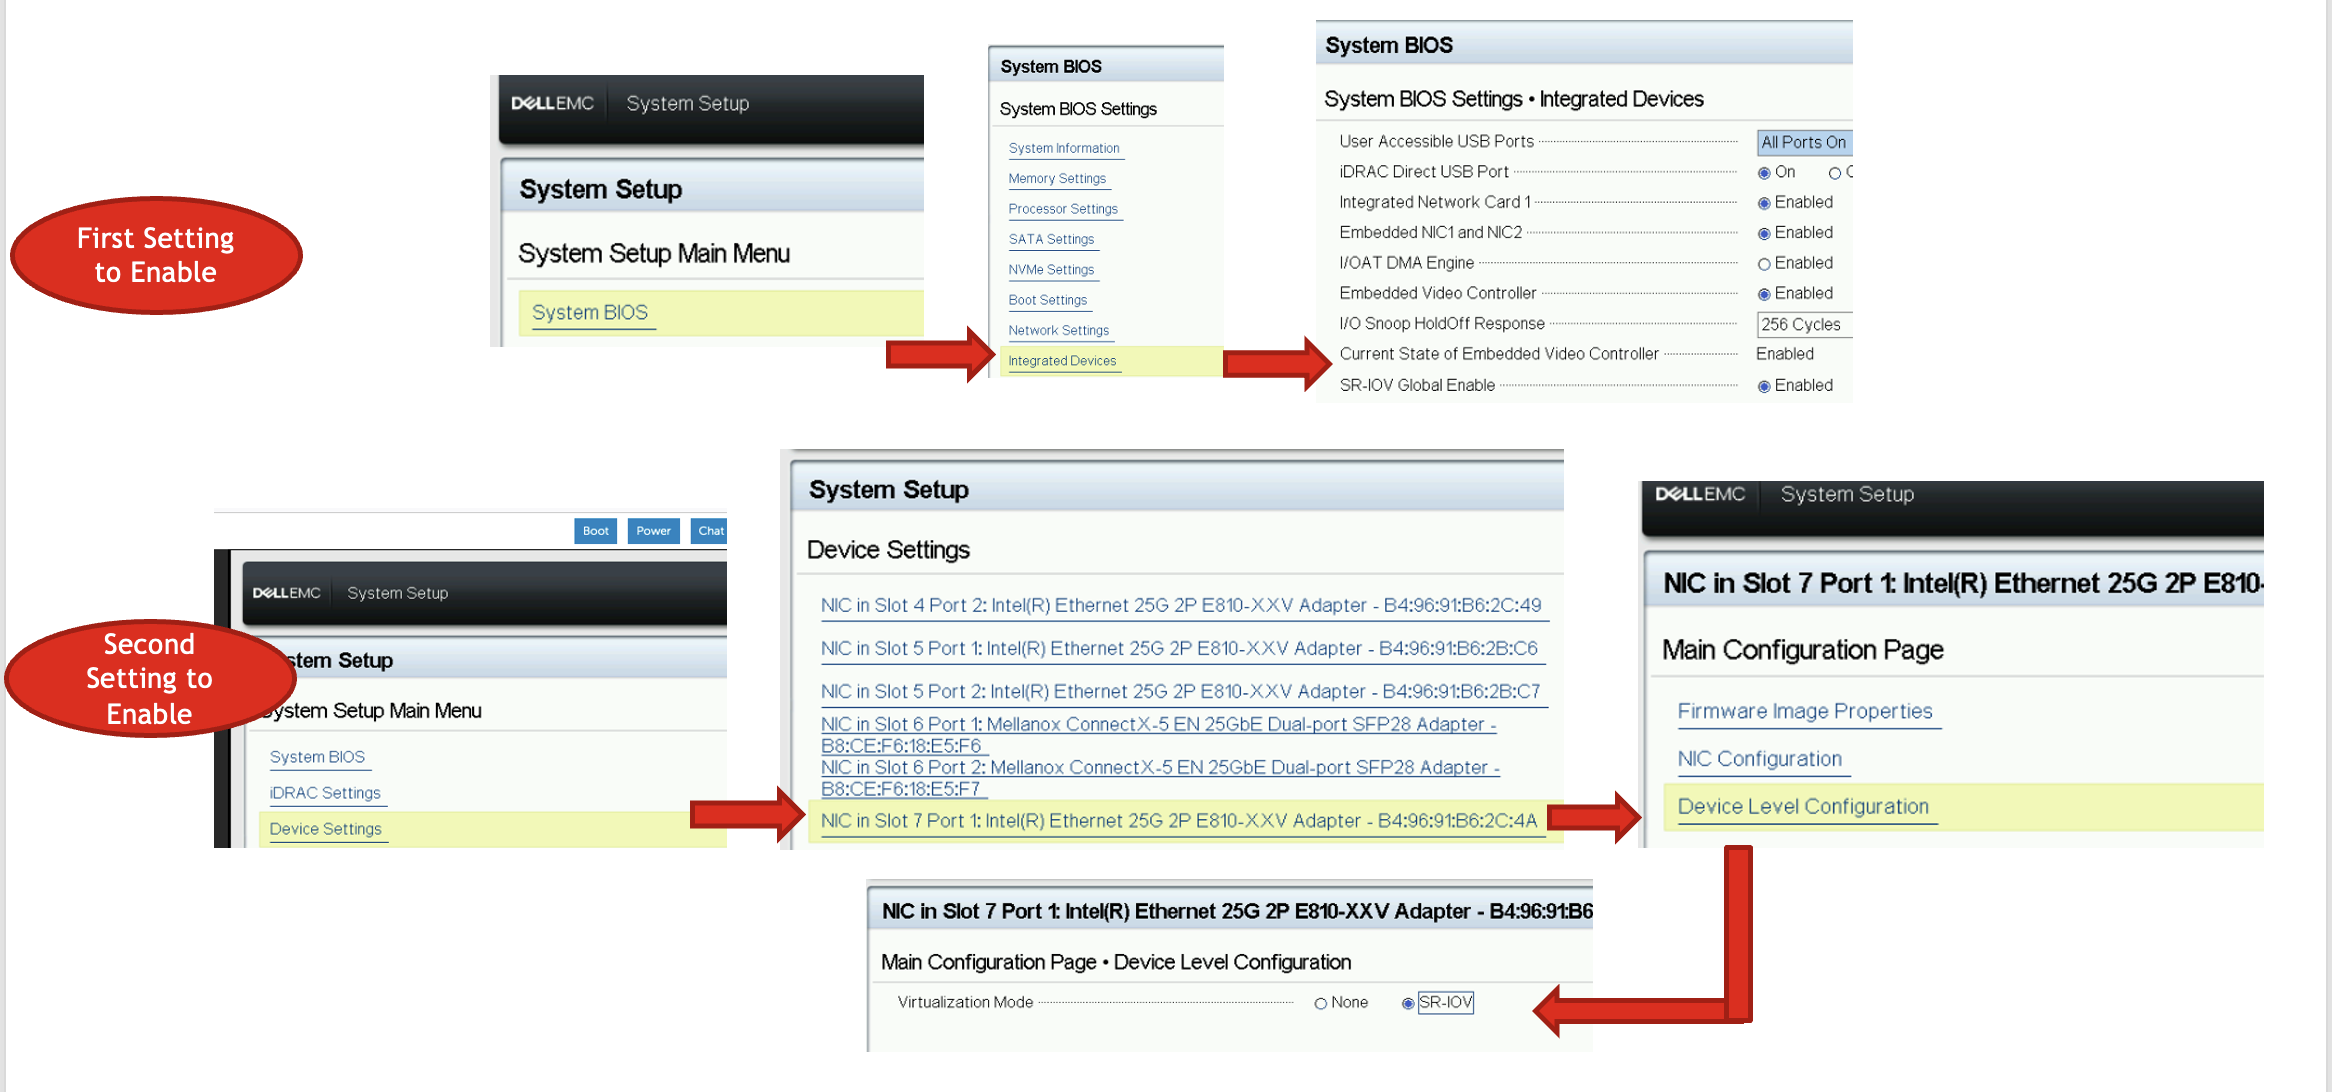
Note: presence of SR-IOV capable interfaces doesn’t automatically imply that these interfaces can be used for SR-IOV. The capability has to be enabled on the server’s BIOS as well. Sometimes that has to be done in multiple menu options in the BIOS, for example in case of Dell R750 servers, there are two different configuration options where SR-IOV needs to be enabled for the functionality to work.
Tip: it's good practice to label the SR-IOV capable nodes. A typically used label is “SriovNetworkNodePolicy.Spec.NodeSelector” with a value set to “true”. This label can later be used by SR-IOV policies as a node selector. The following example shows the process to label a node:
Once the operator is onboarded, there following steps are required to use the SR-IOV functionality:
Create and configure the virtual function (VF) interfaces. That is achieved by creating a SR-IOV Network Node Policy.
Create a Network-Attachment-Definition using those interfaces.
Associate the Network-Attachment-Definition with Pod/VM to utilize the created VF.
The following figure shows the visual flow of these steps:
Using SR-IOV - Step 1: Create and Configuring SR-IOV Network Node Policy:
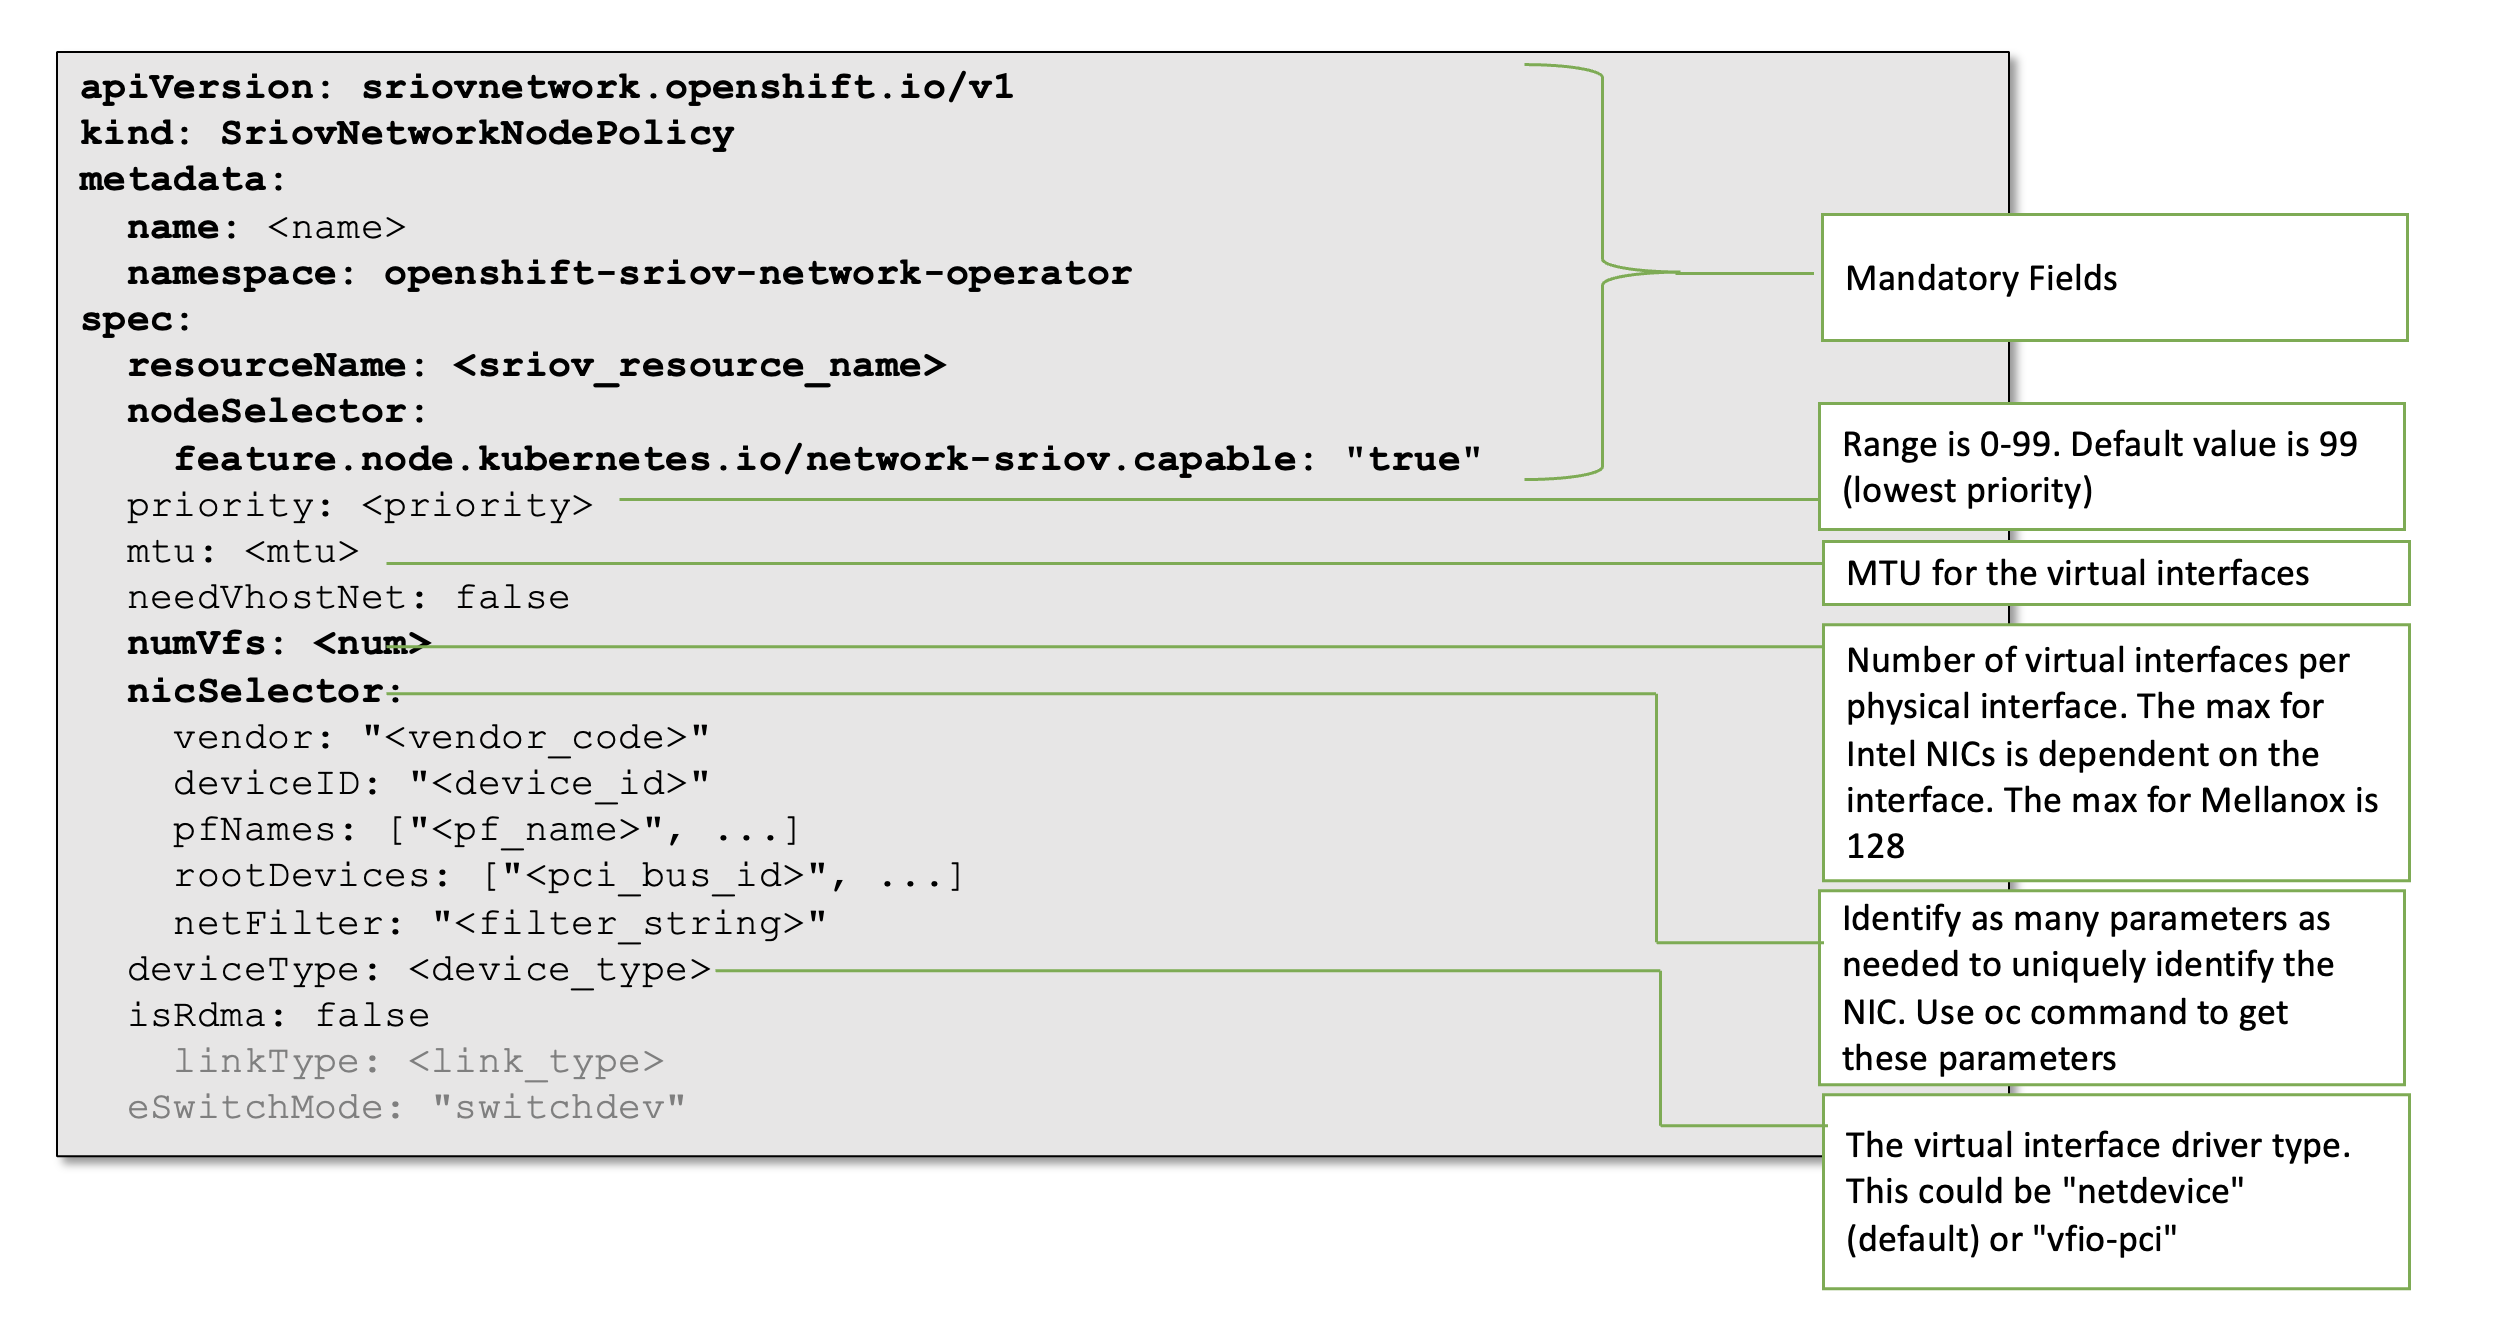
The following figure shows the parameters for creating and configuring and SR-IOV Network Node Policy. Not all parameters are required, and the mandatory ones are identified using bold font here.
A template for this manifest is available at the GitHub. Explanation of some of the parameters is provided below:
resourceName: This could be any name, as long as the name contains only letters and numbers, i.e. complies with the reg-exp "^[a-zA-Z0-9_]+$".
Priority/MTU: These are optional and don’t need to be configured unless needed
needVhostNet: This can be set to true to mount /dv/vhost-net in the pod and use it with DPDK to forward to Kernet’s Networking stack. By default, it's false.
numVfs: This sets the number of virtual functions that will be created by SR-IOV. The maximum number of virtual functions allowed depends on the NIC type. For Intel NIC, it depends on the device type. For Mallanox, the max can be 128.
Note: If multiple policies are being defined for the same physical interface, then the numVFs should be identical between those policies.
nicSelector: Not all the sub parameters need to be defined. Only enough information is needed that can uniquely identify a NIC. To pull up the information for the NICs in a system, the following command can be used:
Some of the parameters that can be used under the nicSelector field are described here:
vendor: The only values allowed are 8086 (Intel NICs) and 15b3 (Mellanox NICs)
deviceID: This identifies the device type for the vendor. One or more deviceIDs can be specified. In case of multiple values, use arrays. Note that this is not a unique value, as can be seen in the above example output.
pfNames: The name of the physical functions/devices. Multiple values can be specified using an array. If the policy being configured is meant for only a subset of virtual functions created, then the pfName can be appended with “#-” values , where “start” and “end” specify the starting and ending VF. e.g. “ens5f0#3-7” will apply the policy only to VF#3 (counting starts from 0) to VF#7 that were created using PF ens5f0. Ofcourse, logical reasoning applies in specifying these ranges, for example the “end” value should be larger than “start” value, and ranges specified in different policies should not overlap.
rootDevices: The pciAddress of the devices goes here. Once more, multiple values can be specified using arrays
Note that at least at least one of these parameters has to be defined in nicSelector: vendor, deviceID, pfNames, rootDevices or netFilter
A sample SR-IOV Network Node Policy is presented below:
This policy will result in creation of 12 VF associated with the physical interface ens7f1.
The deviceType choice is important here as it will determine which driver is loaded on the VF before it’s passed to the pods, and hence affects how that resulting VF will be exposed to the pods:
deviceType “Netdevice” means that the kernel driver loaded will result in the VF being presented as a regular networking device. Hence it has networking interface functionality (courtesy of the network interface card driver embedded in the host’s kernel). The Pod sees this as an interface that has been offered to it. Such a VF will, therefore, appear as a regular ethernet interface within the Pod.
deviceType “vfio-pci” will result in the VF getting mounted as a generic device in the container. The driver loaded on this character device (i.e. VFIO) provides direct device access to the Pod. This deviceType option fulfills the requirements of the type of Pods that do not want to use the network interface card (NIC) driver that is present in thost host’s kernel, rather these pods want to load their own NIC driver which may include enhancements and functionalities that this Pod requires from a network interface. One example of such enhancements is the Data Plane Development Kit (DPDK) that is meant to improve the achievable throughput. So in some ways, it can be said that the VFIO driver disassociates the host’s kernel device driver from the VF, and passes it to the Pod as a raw device; allowing the Pod to load its own device driver on this PCI device.
Creation of these interfaces can be verified by viewing the OpenShift resource “SriovNetworkNodeState”, as shown here:
There are a few things that are worth explaining the above manifest:
The policy name and the resource name are called out in the .spec section of the output, indicating the number of VFs desired
In the .status section of the output, the maximum number of VFs supported by an interface is indicate as “totalvfs” and the driver loaded on the interface is shown as well. In the above output, for example, ens7f0 is capable of supporting 128 VFs and Intel’s “ice” driver loaded for the interface.
For the interface that is being configured using SR-IOV (ens7f1 in the above example) the VFs and their details are shown first. In the VF details, the VF type configured is indicated under the “driver” field. In the output above, it shows “vfio-pci”, which is based on the “vfio-pci” defined under the “deviceTypes” field of the SriovNetworkNodePolicy. If “netdevice” had been used instead, the “driver” field would have shown “iavf”.
Note that each of the VF has a PCI address associated with it. Therefore, these VF can now be passed as a PCIe device to a VM or a Pod.
The syncStatus shows “Succeed”, which implies the policy has been applied to the node. This would have resulted in the VFs getting created on the server. However, it is prudent to verify this information by logging into the OpenShift node and ensure that the VF are indeed created. The following two methods can be used for this:
oc debug node/sno-node
Starting pod/sno-node ...
To use host binaries, run `chroot /host`
Pod IP: 192.168.12.112
If you don't see a command prompt, try pressing enter.
sh-4.4# chroot /host

Option#1:Viewing the number of VFs created using a physical interface (e.g. ens7f1)

sh-4.4# cat /sys/class/net/ens7f1/device/sriov_numvfs
12
sh-4.4#

Option#2:Viewing the interface list on the node and filtering that for “vf”


sh-4.4# ip link show ens7f1| grep vf
    vf 0     link/ether 7a:80:25:78:d4:08 brd ff:ff:ff:ff:ff:ff, spoof checking on, link-state auto, trust off
    vf 1     link/ether aa:7b:c3:24:7f:bf brd ff:ff:ff:ff:ff:ff, spoof checking on, link-state auto, trust off
    vf 2     link/ether 12:5c:86:d7:03:0d brd ff:ff:ff:ff:ff:ff, spoof checking on, link-state auto, trust off
    vf 3     link/ether aa:d3:67:fa:74:03 brd ff:ff:ff:ff:ff:ff, spoof checking on, link-state auto, trust off
    vf 4     link/ether d6:f1:aa:61:6e:78 brd ff:ff:ff:ff:ff:ff, spoof checking on, link-state auto, trust off
    vf 5     link/ether 42:64:1a:76:fa:2e brd ff:ff:ff:ff:ff:ff, spoof checking on, link-state auto, trust off
    vf 6     link/ether 92:8f:fc:a4:86:67 brd ff:ff:ff:ff:ff:ff, spoof checking on, link-state auto, trust off
    vf 7     link/ether d6:cf:48:04:9f:40 brd ff:ff:ff:ff:ff:ff, spoof checking on, link-state auto, trust off
    vf 8     link/ether 9a:fe:bb:39:4d:51 brd ff:ff:ff:ff:ff:ff, spoof checking on, link-state auto, trust off
    vf 9     link/ether 76:61:00:1c:86:aa brd ff:ff:ff:ff:ff:ff, spoof checking on, link-state auto, trust off
    vf 10     link/ether e2:bd:28:10:ef:0c brd ff:ff:ff:ff:ff:ff, spoof checking on, link-state auto, trust off
    vf 11     link/ether 2a:d5:45:df:bd:85 brd ff:ff:ff:ff:ff:ff, spoof checking on, link-state auto, trust off
sh-4.4#
Using SR-IOV - Step 2: Create Network Attachment Definitions (By defining an SR-IOV Network):
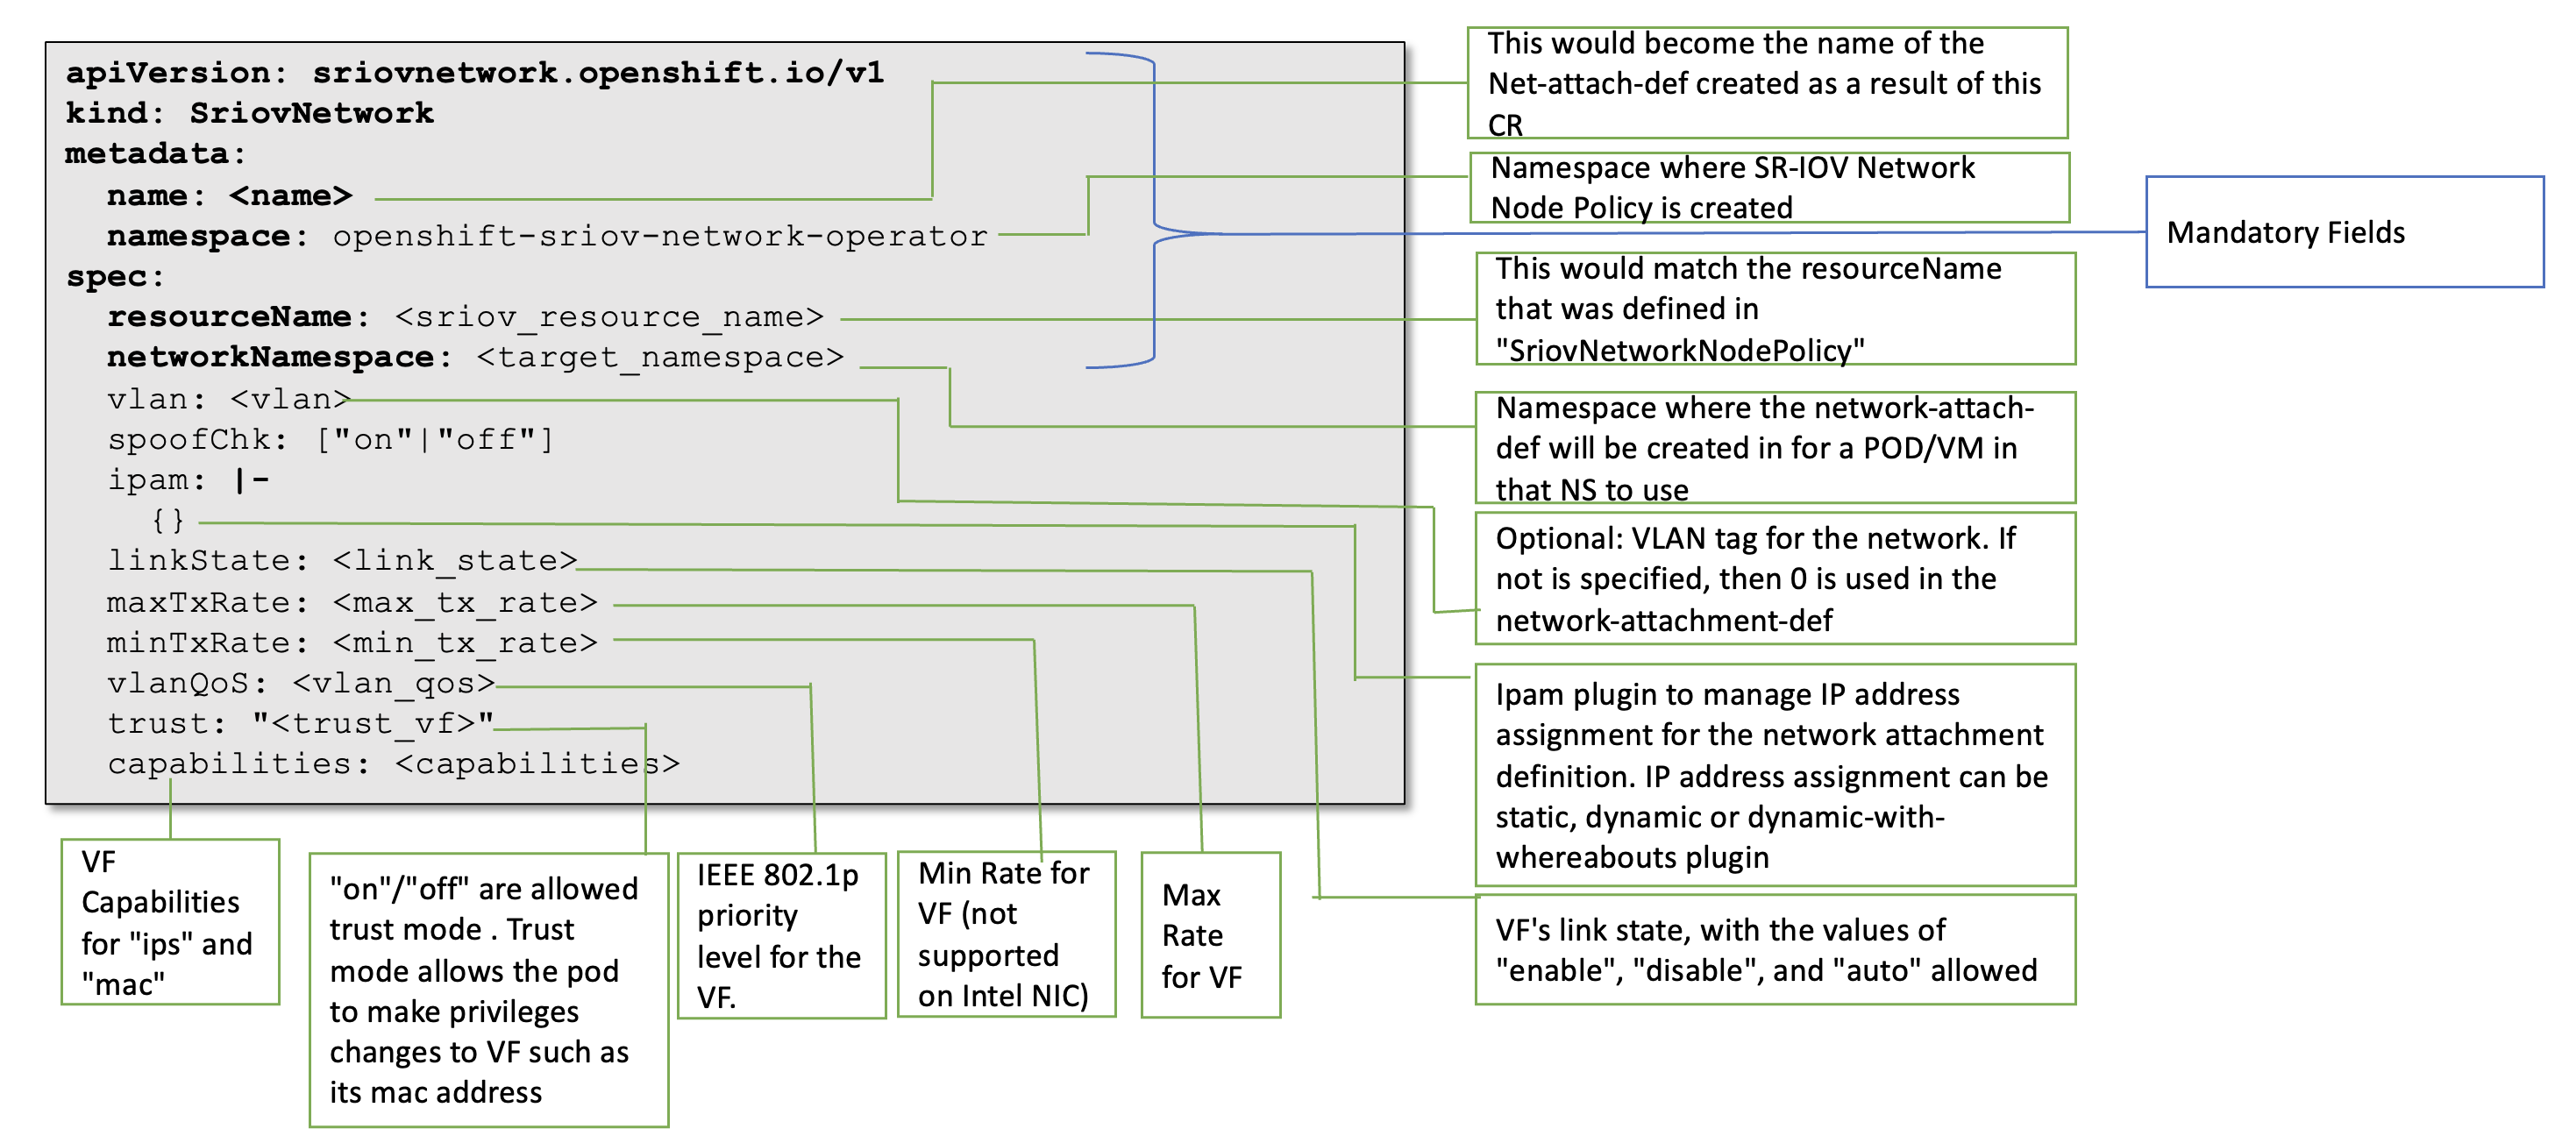
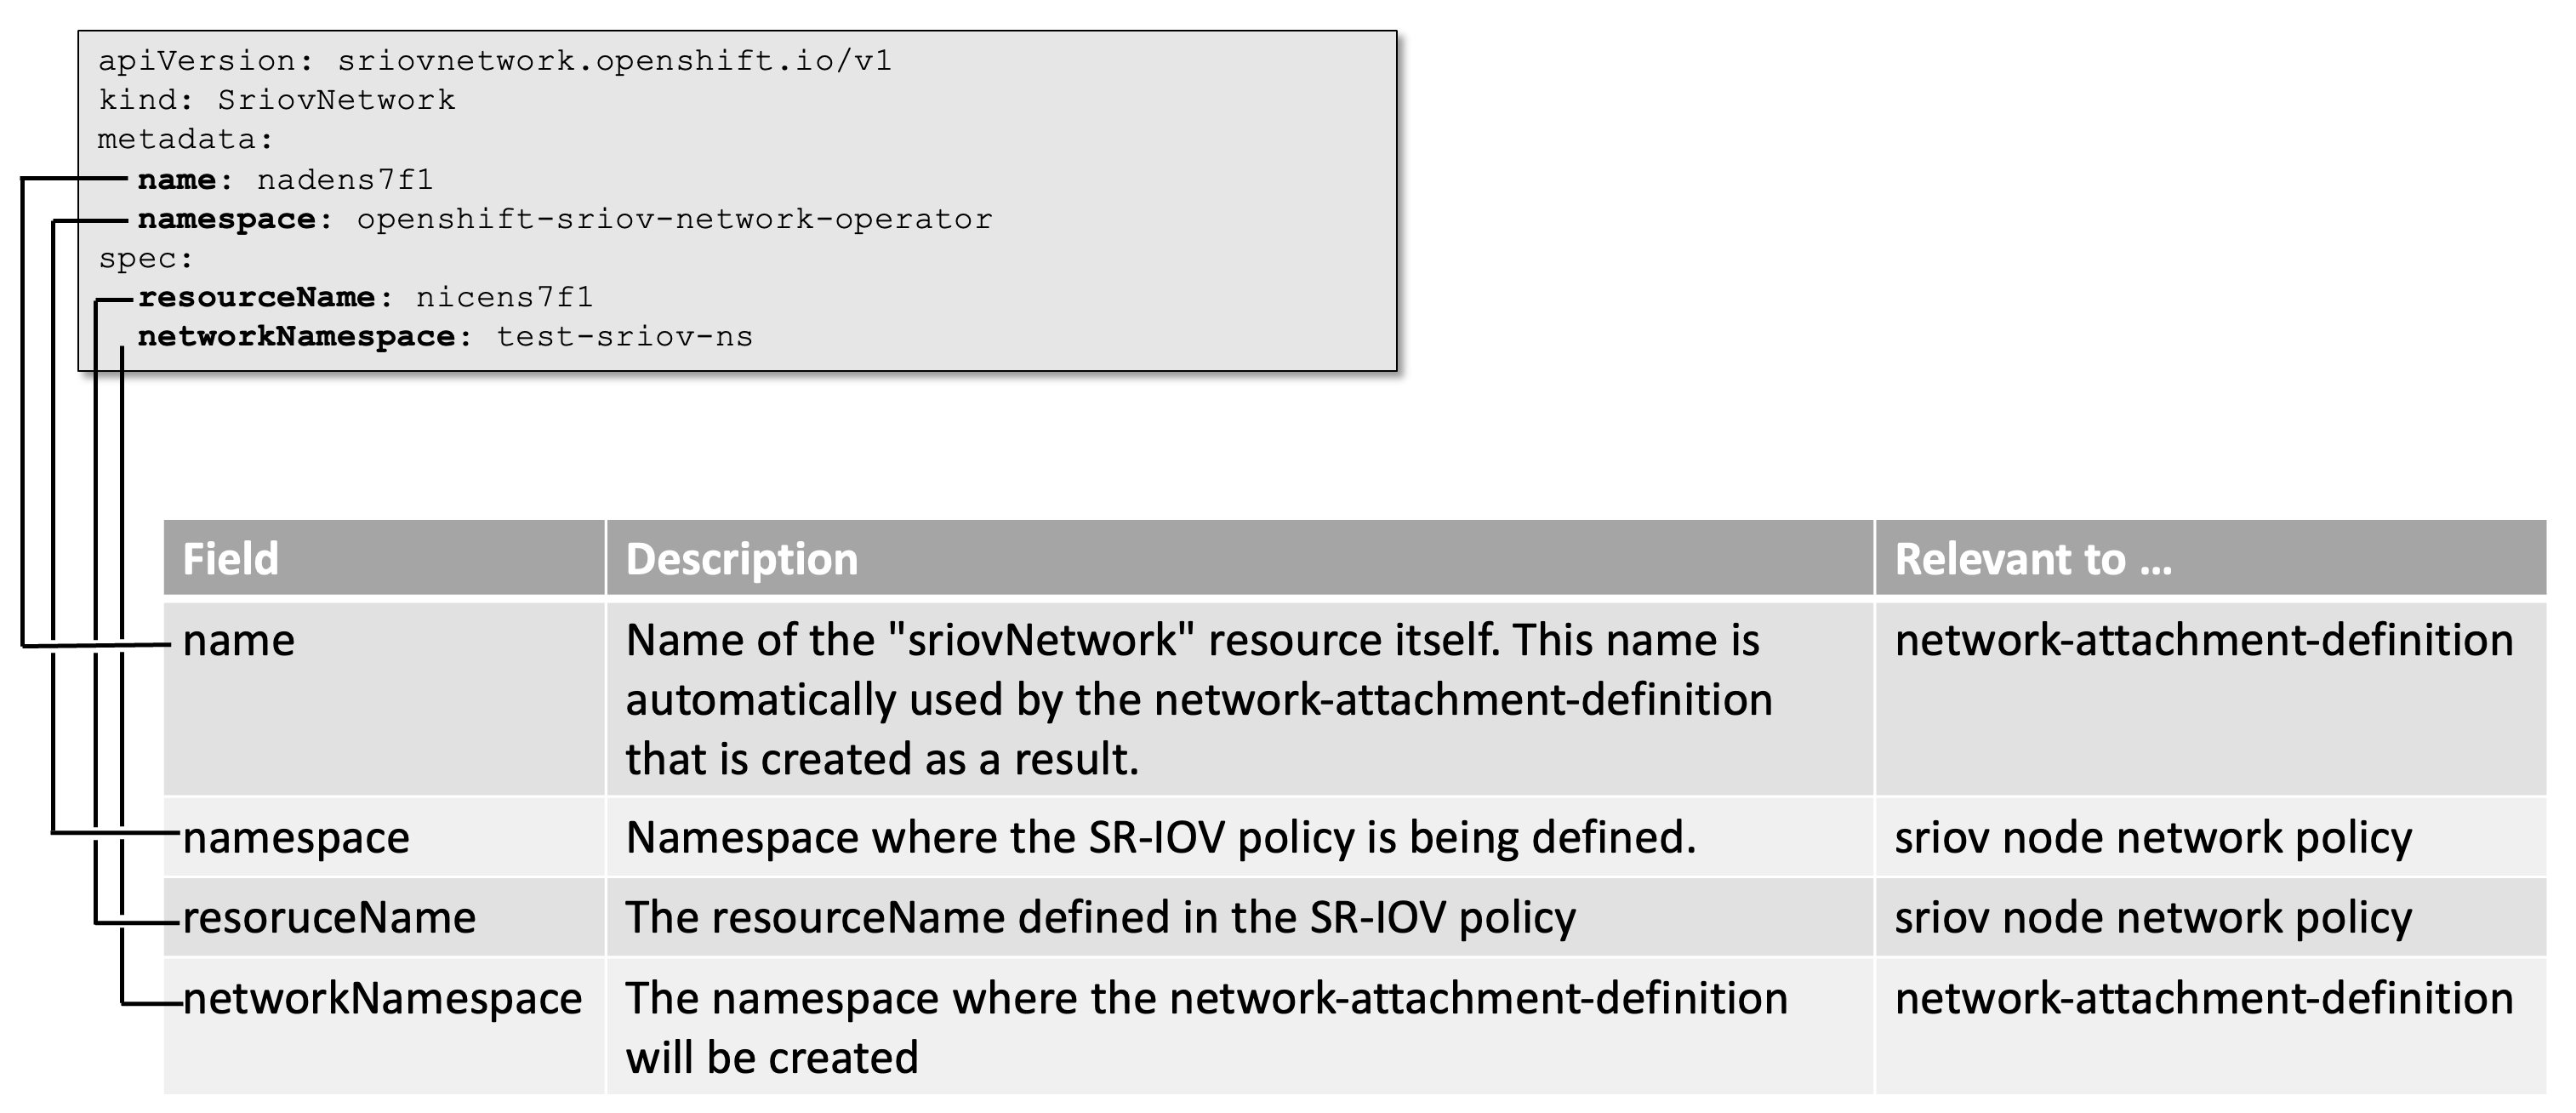
To use the VF that have been created by a sriov-network-node-definition, a network attachment definition is now needed. Instead of directly creating a network attachment definition, in this case the Kubernetes CRD “sriovnetwork” is used instead. This CRD automatically creates the network-attachment-definition object. The following parameters can be defined when creating a resource of sriovnetwork type:
Note that the terms “name”, “namespace”, “resourceName” and “networkNamespace” can appear confusing in this definition. The following table is meant to help understand the meanings behind each of these:
A sample manifest (available on Git), that uses the previously defined sriov-network-node-policy is shown below:
$ oc apply -f sriov-nad.yaml
namespace/test-sriov-ns created
sriovnetwork.sriovnetwork.openshift.io/nicens7f1 created
$
$ oc get sriovnetwork.sriovnetwork.openshift.io -A
NAMESPACE                          NAME        AGE
openshift-sriov-network-operator   nadens7f1   2m6s
$
Note that the message indicates that source type sriovnetwork is being created in the namespace where SR-IOV is installed (in this case “openshift-sriov-network-operator”). As a consequence (and this part is not obvious in the message above) the network-attach-definition is also created in the networkNamespace. This can be verified as shown below:
$ oc get sriovnetwork -A
NAMESPACE                          NAME        AGE
openshift-sriov-network-operator   nadens7f1   33s

$ oc get network-attachment-definitions.k8s.cni.cncf.io
NAME        AGE
nicens7f1   47s
More details about this resource can be seen using yaml dump of the CR:
Using SR-IOV - Step 3: Referencing the Network-Attachment in a Pod
Now that the network-attachment-definition is created, it can be allocated to a pod just like any other additional network interface would be, i.e. using the annotation “k8s.v1.cni.cncf.io/networks”. An example pod manifest (also avaialable on Git) is shown below:
The interface (or rather, the PCIe device) is now available inside the Pod. If the deviceType vfio-pci was used, like in the examples in this blog, then this device will not appear as a regular interface inside the pod. That's because it was passed as a raw PCIe device. To view this PCIe device inside the pod, user can attach to the pod and verify the vfio device exist as shown below:
$ oc exec -it pod-using-sriov -- /bin/bash

[root@pod-using-sriov /]# ls -al /dev/vfio/
total 0
drwxr-xr-x. 2 root root       80 Jun 19 20:22 .
drwxr-xr-x. 6 root root      380 Jun 19 20:22 ..
crw-rw-rw-. 1 root  801 234,   2 Jun 19 20:22 311
crw-rw-rw-. 1 root root  10, 196 Jun 19 20:22 vfio
[root@pod-using-sriov /]#
If, however, the VF was passed a netdevice DeviceType, then the ethernet interface drivers are already loaded on it when its passed to the Pod as a PCIe device. In that scenario, the interface would have show up among the other interfaces visible inside the pod:
Now that the interface is available to the Pod, it can be used as desired by the application.
While this blog covers all the basics and essential pieces of information to create, configure and use SR-IOV to create virtual interfaces and pass those to Pods, there are quite a few knobs and advanced configuration options that may be used to tweak some of the parameters. Those advanced configuration items will be discussed in a subsequent blog.