Deploying Cisco XRd on Red Hat OpenShift

This blog provides step by step instructions on how to onboard and configure Cisco XRd Control Plane on Red Hat OpenShift in a lab environment.
What is Cisco XRd anyway?
Cisco XRd is a containerized router running Cisco’s flagship IOS-XR operating system and can be instantiated on any cloud infrastructure, public or private. XRd is available in 2 flavors:.
- XRd Control Plane: Targeted towards compute heavy use cases such as a virtual Route reflector (vRR) or a Path Computation Element (PCE), and
- XRd vRouter: Can be used as virtual PE (vPE) or virtual Cell Site Router (vCSR) that focuses on packet forwarding
Both XRd variants, XRd Control Plane and XRd vRouter are vendor validated and listed as supported CNF for Red Hat OpenShift Container Platform. You can get your copy of XRd here.
Onboarding XRd on Red Hat OpenShift is 5 step process that includes:
- Preparing the cluster by tweaking default system parameters to XRd required values
- Preparing the XRd tenant environment by creating name space and service accounts
- Defining a startup config for XRd router, if so desired
- Onboarding the XRd router with desired number of interfaces
- Connecting to and configuring your new XRd router
Lab Topology and PreRequisites
The goal of this blog is pretty simple: Learn how to onboard XRd on Red Hat OpenShift. As such, a very simple topology is used in this blog. If you have a baremetal server (or a virtual machine) capable of running Red Hat OpenShift, you can also set up this topology in your home lab.
The following topology is used in this blog throughout.
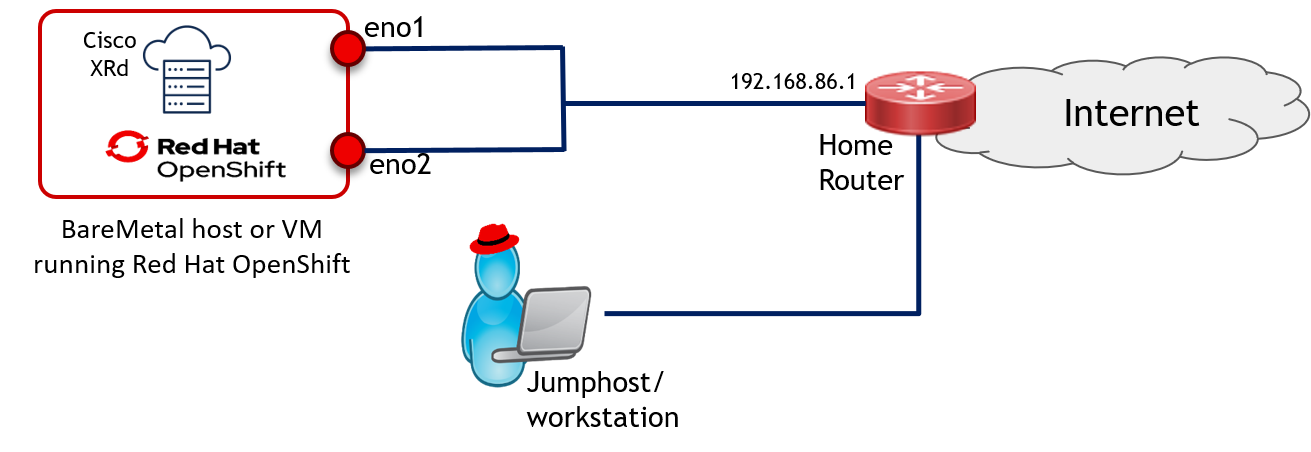
Prerequisites
Your topology should have the following.
- A functional OpenShift Cluster
- You can install Red Hat Single Node Openshift (SNO) using Red Hat Assisted Installer as defined here.
- A jumphost/workstation with OpenShift client (aka oc cli) installed. OC cli client is used to interact with the OpenShift cluster.
XRd Requirements
Like any other latency sensitive and/or CPU extensive workload, XRd’s container needs to fine tune the host its running on for optimal performance. Some of these requirements are mandatory to run XRd in a testing environment, while others are recommended parameter settings for a production environment. Omitting the production requirements may cause run time issues resulting in an unstable system. However, omitting the lab requirements will result in the XRd CNF failing to reach running state.
Following are the requirements for XRd 7.8.1, the version used in this blog:
| Provider | Requirement | Desired Value | Default | Required? |
|---|---|---|---|---|
| Hardware | Architecture | x86 | N/A | Required |
| Hardware | CPU Cores | 2 | N/A | Required |
| Basic OpenShift | Min Kernel Version | 4.0 | 4.x | Required |
| Basic OpenShift | Exact Cgroup Version | 1 | 1 (2 is available, not enabled) | Required |
| Basic OpenShift | PID Limit | 2500 | 4096 | Required |
| Basic OpenShift | Sysctl fs.inotify.max_user_instances (minimum for 1 instance ) | 4000 | 8192 | Required |
| Basic OpenShift | netdev_max_backlog | 30000 | 1000 | Required |
| Basic OpenShift | optmem_max | 67108864 | 81920 | Recommended |
| Basic OpenShift | rmem_default | 67108864 | 212992 | Recommended |
| Basic OpenShift | rmem_max | 67108864 | 212992 | Recommended |
| Basic OpenShift | wmem_default | 67108864 | 212992 | Recommended |
| Basic OpenShift | wmem_max | 67108864 | 212992 | Recommended |
| Performance Profile | Huge Page Size | 1GB | - | - |
| Performance Profile | # of Huge Pages | 2 | - | Optional |
| TuneD | Address-Space Layout Randomization with data segments Sysctl kernel.randomize_va_space | 2 | 2 | Required |
| TuneD | Sysctl net.ipv4.ip_local_port_range | 1024 - 65535 | 32768 - 60999 | Required |
| TuneD | Sysctl net.ipv4.tcp_tw_reuse | 1 | 2 | Required |
| TuneD | Sysctl net.core.rmem_max | 67108864 | 212992 | Required |
| TuneD | Sysctl net.core.wmem_max | 67108864 | 212992 | Required |
| TuneD | Sysctl net.core.rmem_default | 67108864 | 212992 | Required |
| TuneD | Sysctl net.core.wmem_default | 67108864 | 212992 | Required |
| TuneD | Sysctl net.ipv4.udp_mem | 1124736 10000000 67108864 | - | Required |
| MachineConfig | Sysctl fs.inotify.max_user_instances (recommended) | 64000 | 8192 | Required |
| MachineConfig | Sysctl fs.inotify.max_user_watches | 65536 | 65536 | Required |
Let’s start working on preparing the cluster with the parameters defined above for XRd deployment.
Step 1: Preparing the Cluster
Like any other software, Red Hat OpenShift is installed with generic, default values. However as mentioned in the table above, XRd requires certain values to be tweaked for its needs.This section covers how to tune the OpenShift cluster using the following:
- Reserve CPU and enable hugepages through performance profile
- Modify systemctl parameters using TuneD profile
- Modify additional parameters through machine configuration
Step 1.1 Reserving CPUs and Enabling Hugepages
Using the node tuning operator that comes pre-packed with OpenShift installation, you can perform multiple node tuning functions such as isolate CPUs for system and application or define hugepages - both of which are achieved by defining a performance profile.
Before starting, verify the total number of CPUs and current status of your hugepages configuration as shown below.
$  oc describe node
(extra output omitted)
Capacity:
  cpu:                32
  ephemeral-storage:  2341403628Ki
  hugepages-1Gi:      0
  hugepages-2Mi:      0
  memory:             131953784Ki
  pods:               250
(extra output omitted)
When you configure reserved and isolated CPUs, the infra containers in pods use the reserved CPUs and the application containers use the isolated CPUs. Performance profile configured below reflects 32 CPUs (from 0 - 31), four of which (0-3) are reserved for openshift infra, whereas the rest (4-31) are available for application workloads.
In addition to isolating CPUs, the performance profile can also be used to configure the node for Hugepages. Based on the XRd requirements mentioned earlier, at least 2 huge pages of size 1G each will need to be enabled as shown in the performance profile below.
Here is the yaml manifest that configures CPU isolation and desired huge pages. The file is called pao.yaml.
$ cat  pao.yaml
apiVersion: performance.openshift.io/v2
kind: PerformanceProfile
metadata:
  name: iosxr-performanceprofile
spec:
  additionalKernelArgs:
  cpu:
    isolated: 4-31
    reserved: 0-3
  hugepages:
    defaultHugepagesSize: 1G
    pages:
      - count: 2
        size: 1G
  nodeSelector:
    node-role.kubernetes.io/master: ""
  realTimeKernel:
    enabled: false
More detail on performance profile can be found in OpenShift documentation here
The yaml file with performance profile can be applied using the oc apply -f construct as shown below. Note that this step will reboot your node.
$ oc apply -f pao.yaml
performanceprofile.performance.openshift.io/iosxr-performanceprofile created
Once the configuration is applied, you can verify that verify the Hugepages configuration using *oc describe* command for the node:
$  oc describe node
(extra output omitted)
Capacity:
  cpu:                32
  ephemeral-storage:  2341403628Ki
  hugepages-1Gi:      2Gi
  hugepages-2Mi:      0
  memory:             131953784Ki
  pods:               250
(extra output omitted)
Note CPU isolation is not explicitly spelled out in oc describe. To verify CPUs have been isolated for application, you can connect to the host using oc debug node command:
$  oc get nodes
NAME          STATUS   ROLES                         AGE   VERSION
kislam-sno1   Ready    control-plane,master,worker   25d   v1.26.5+0001a21

$  oc debug nodes/kislam-sno1
(snip)
To use host binaries, run `chroot /host`
sh-4.4# chroot /host
sh-5.1#
sh-5.1# cat /proc/cmdline
BOOT_IMAGE=(hd0,gpt3)/ostree/rhcos-0dadda946d062e8aa24b556b328d771913c491d8ecc8f450cf441d822dad9d6c/vmlinuz-5.14.0-284.16.1.el9_2.x86_64 ignition.platform.id=metal ostree=/ostree/boot.0/rhcos/0dadda946d062e8aa24b556b328d771913c491d8ecc8f450cf441d822dad9d6c/0 ip=eno1:dhcp root=UUID=889653ed-cfd0-4d58-9f3e-4c6d5041c625 rw rootflags=prjquota boot=UUID=ff9fdde6-3867-450c-8c57-785edd2e07ee systemd.unified_cgroup_hierarchy=0 systemd.legacy_systemd_cgroup_controller=1 skew_tick=1 nohz=on rcu_nocbs=4-31 tuned.non_isolcpus=0000000f
systemd.cpu_affinity=0,1,2,3  intel_iommu=on iommu=pt isolcpus=managed_irq,4-31 nohz_full=4-31 tsc=nowatchdog nosoftlockup nmi_watchdog=0 mce=off rcutree.kthread_prio=11
default_hugepagesz=1G intel_pstate=disable
Since this is a single node cluster, there are no additional nodes in the cluster to apply the profile. However, if a multiple node cluster was being used, the performance profile could be directed towards a subset of nodes by using an appropriate node selector.
1.2 Modify SystemCtl Parameters through TuneD Profile
Linux kernel parameters can be enabled, set, or disabled using sysctl. These settings can be altered by changing parameters in sysctl configuration (using /etc/sysctl.conf, or a file under /etc/sysctl.d/). However, the preferred way to tweak system parameters on RHEL (7 onwards) and Red Hat CoreOS (the default OS for OpenShift) is to use the TuneD service. Detailed description of TuneD is beyond the scope of this blog. On a system running OpenShift, the tuned values can be altered by using the tuneD resource type which then ensures that the configuration is applied to the OpenShift nodes.
In the case of XRd, there are a number of kernel parameters that need to be adjusted. While some of these requirements may be met by the default configuration, others may need to be altered. The following tuneD manifest ensures that required tweaks are made to the system:
$ cat /tuned.yaml
apiVersion: tuned.openshift.io/v1
kind: Tuned
metadata:
  name: sysctl-updates-iosxr
  namespace: openshift-cluster-node-tuning-operator
spec:
  profile:
  - name: cisco-xrd-profile
    data: |
      [main]
      summary=A custom profile for Cisco xrd
      include=openshift-node-performance-iosxr-performanceprofile
      [sysctl]
      net.ipv4.ip_local_port_range="1024 65535"
      net.ipv4.tcp_tw_reuse=1
      kernel.randomize_va_space=2
      net.core.rmem_max=67108864
      net.core.wmem_max=67108864
      net.core.rmem_default=67108864
      net.core.wmem_default=67108864
      net.core.netdev_max_backlog=300000
      net.core.optmem_max=67108864
      net.ipv4.udp_mem="1124736 10000000 67108864"
  recommend:
  - machineConfigLabels:
      machineconfiguration.openshift.io/role: master
    priority: 10
    profile: cisco-xrd-profile
Note that this tuned profile embeds a tuned profile called openshift-node-performance-iosxr-performanceprofile in it. That's because only one tuned profile can be applied at a time. The “openshift-node-performance-iosxr-performanceprofile” exists as a result of the performance profile created in last step. If this profile is not included, some of the changes made by the performance profile (specifically, the CPU isolation) will be undone. Before applying the new profile,the following command can be used to verify that currently the TuneD profile applied is one that was auto-generated by performance profile.
$ oc get profile -A
NAMESPACE                                   NAME          TUNED                                                 APPLIED   DEGRADED   AGE
openshift-cluster-node-tuning-operator      kislam-sno1   openshift-node-performance-iosxr-performanceprofile   True      False      12d
Now lets apply the new tuned profile:
$ oc apply -f  tuned.yaml
tuned.tuned.openshift.io/sysctl-updates-iosxr created
At this point, you can verify that the new profile has been applied, as shown in the following command output:
$  oc get profile -A
NAMESPACE                                NAME          TUNED               APPLIED   DEGRADED   AGE
openshift-cluster-node-tuning-operator   kislam-sno1   cisco-xrd-profile   True      False      12d
Now that TuneD profile have configured the system, you can validate that the individual parameters set by this profile are being configured on the OpenShift node by connecting to the node using oc debug. The example below shows net.ipv4.ip_local_port_range parameters verified.
$  oc debug nodes/kislam-sno1

sh-4.4# chroot /host
sh-5.1#
sh-5.1# sysctl net.ipv4.ip_local_port_range
net.ipv4.ip_local_port_range = 1024     65535
1.3 Modify Additional Kernel Parameters
Generally all the kernel settings are done using a tuned manifest. However, if a machine config is also tweaking those parameters then the Machine Config takes precedence and hence overrides those specific changes made using the tuned manifest.
There are two XRd required parameters that were skipped in the previous section’s tuned manifest for this reason, specifically “fs.inotify.max_user_watches” and “fs.inotify.max_user_instances”. The following Machine Config sets the defaults for these parameters:
$ oc get mc 00-master -o yaml | grep inotify
          source: data:,%0Afs.inotify.max_user_watches%20%3D%2065536%0Afs.inotify.max_user_instances%20%3D%208192%0A
        path: /etc/sysctl.d/inotify.conf
Even if these were configured using tuneD, the values configured by this Machine Config will override that change. You can verify these parameters by attaching to node using oc debug:
$  oc debug nodes/kislam-sno1
(extra output omitted)
sh-4.4# chroot /host
sh-5.1# sysctl fs.inotify.max_user_watches
fs.inotify.max_user_watches = 65536
sh-5.1# sysctl fs.inotify.max_user_instances
fs.inotify.max_user_instances = 8192
To override these default values, create the following Machine Config:
$ cat mc.yaml
apiVersion: machineconfiguration.openshift.io/v1
kind: MachineConfig
metadata:
  labels:
    machineconfiguration.openshift.io/role: master
  name: 99-master-sysctl-inotify-override-iosxr
spec:
  config:
    ignition:
      config: {}
      security:
        tls: {}
      timeouts: {}
      version: 3.2.0
    networkd: {}
    passwd: {}
    storage:
      files:
       - contents:
           source: data:,%0Afs.inotify.max_user_watches%20%3D%2065536%0Afs.inotify.max_user_instances%20%3D%2064000%0A
         mode: 420
         overwrite: true
         path: /etc/sysctl.d/inotify.conf
Before applying the machineconfig profile, verify the current status of the rendered profile as shown below:
$ oc get mcp
NAME     CONFIG                                             UPDATED   UPDATING   DEGRADED   MACHINECOUNT   READYMACHINECOUNT   UPDATEDMACHINECOUNT   DEGRADEDMACHINECOUNT   AGE
master   rendered-master-c2747a89a379d8399e59be44fec491cb   True      False      False      1              1                   1                     0                      26d
worker   rendered-worker-ba6e582847abbb870c9a59d72c2f6f45   True      False      False      0              0                   0                     0                      26d
Now apply the new MachineConfig as shown below. Note that this step will trigger a node reload
$ oc apply -f  mc.yaml
machineconfig.machineconfiguration.openshift.io/99-master-sysctl-inotify-override-iosxr created
After the node is reloaded, check the MachineConfig profile. The new profile will be in updating state as show below:
$ oc get mcp

NAME     CONFIG                                             UPDATED   UPDATING   DEGRADED   MACHINECOUNT   READYMACHINECOUNT   UPDATEDMACHINECOUNT   DEGRADEDMACHINECOUNT   AGE
master   rendered-master-c2747a89a379d8399e59be44fec491cb   False     True       False      1              0                   0                     0                      26d
worker   rendered-worker-ba6e582847abbb870c9a59d72c2f6f45   True      False      False      0              0                   0                     0                      26d
After a little while, the MachineConfig profile will transition from updating to updated. At this point, the MCP is good to go.
$ oc get mcp
NAME     CONFIG                                             UPDATED   UPDATING   DEGRADED   MACHINECOUNT   READYMACHINECOUNT   UPDATEDMACHINECOUNT   DEGRADEDMACHINECOUNT   AGE
master   rendered-master-6032be30b1c55d78578108e880c9b2dc   True      False      False      1              1                   1                     0                      26d
worker   rendered-worker-ba6e582847abbb870c9a59d72c2f6f45   True      False      False      0              0                   0                     0                      26d
Once the Machine Config Profile has transition to Updated = True and stays at Upgraded=Fales, you can attach to the node and verify the new values:
$ oc debug nodes/kislam-sno1
(extra output omitted)
sh-4.4# chroot /host
sh-5.1# sysctl fs.inotify.max_user_instances
fs.inotify.max_user_instances = 64000 <<<< previous/default value of 8192 changed to 64K
At this point all the node tuning has been completed and you can start preparing the XRd tenant.
Step 2: Preparing the XRd Tenent Environment
Once nodes’ system parameters are tuned in preparation of XRd deployment, you can create the XRd environment by:
- Creating a namespace for XRd containers
- Creating a service account to be used by XRd
- Assigning applicable privileges to the service account
Step 2.1 Creating a Namespace
A kubernetes namespace is a virtual sub-space that provides logical isolation to resources (such as pods, services, etc) of a project. OpenShif uses the umbrella term project to refer to namespaces.
The following manifest will be used to create a namespace called “xrd”.
$ cat  ns.yaml
apiVersion: v1
kind: Namespace
metadata:
  name: xrd
  labels:
    kubernetes.io/metadata.name: xrd
Now apply this manifest on your system to create this namespace.
$ oc apply -f  ns.yaml
namespace/xrd created
Once the manifest is applied, verify that the project is indeed created"
$ oc get project | grep xrd
xrd                                                               Active
While the new namespace (XRd) is now created, your oc commands will continue to use your current namespace by default It will save you some future typing if you switch to the newly create name space by using the following command:
$ oc project xrd
Now using project "xrd" on server "https://api.kislam-sno1.example.com:6443".
Now lets create a Service Account for XRd to use.
Step 2.2: Create a Service Account
Currently, XRd needs privileged access to some of the host’s resources. It, therefore, needs to run as a privileged pod, and hence should be run by a privileged user or service account. For this purpose, a new service account will need to be created using the process below.
Optionally, you can first verify which service accounts already exists on the system:
$ oc get serviceaccounts
NAME       SECRETS   AGE
builder    1         71m
default    1         71m
deployer   1         71m
Here is the manifest that will create the user account called xrd-sain the newly created xrd namespace:
$ cat   sa.yaml
apiVersion: v1
kind: ServiceAccount
metadata:
  creationTimestamp: null
    name: xrd-sa
  namespace: xrd
Verify that the new service account is created:
$ oc get serviceaccounts
NAME       SECRETS   AGE
builder    1         72m
default    1         72m
deployer   1         72m
xrd-sa     1         2s
Step 2.3: Giving Privileged Access to the Service Account
To complete the process of creating a privileged service account, the newly created service account will now be bound with a pre-existing role called privileged. The list of pre created roles and their privilege status can be found using the following command:
$ oc get scc -o custom-columns='NAME:.metadata.name','RUNAS:.runAsUser.type,PRIV_CONTAINER:.allowPrivilegedContainer'
NAME                              RUNAS              PRIV_CONTAINER
(extra output omitted)
privileged                        RunAsAny           true
(extra output omitted)
Here is the manifest that bound the xrd-sa service account with the privileged role:
$ cat role.yaml
apiVersion: rbac.authorization.k8s.io/v1
kind: ClusterRoleBinding
metadata:
  name: system:openshift:scc:privileged
roleRef:
  apiGroup: rbac.authorization.k8s.io
  kind: ClusterRole
    name: system:openshift:scc:privileged
subjects:
- kind: ServiceAccount
  name: xrd-sa
  namespace: xrd
Now apply this manifest as shown below:
$ oc apply -f role.yaml
clusterrolebinding.rbac.authorization.k8s.io/system:openshift:scc:privileged created
Once the manifest is applied, verify that xrd-sa is now a privileged user.
$ oc get clusterrolebindings -o wide
(extra output omitted)
NAME                            ROLE                                            AGE     USERS       GROUPS  SERVICEACCOUNTS
system:openshift:scc:privileged  ClusterRole/system:openshift:scc:privileged    2m15s                       xrd/xrd-sa
(extra output omitted)
Now that the enviroment for XRd tenent is created, let move on to define a startup configuration for containerized XRd router.
Step 3: Define Startup Configuration For XRd Router
Before deploying an XRd instance on OpenShift, a startup configuration could be made available for the router using configmap.
Here is a configmap that provides very basic configuration - hostname, username and password - to the XRd container:
$ cat configmap.yaml
apiVersion: v1
kind: ConfigMap
metadata:
  name: xrd-control-plane-config
  namespace: xrd
  annotations:
  labels:
    helm.sh/chart: xrd-control-plane-1.0.1
    app.kubernetes.io/name: xrd-control-plane
    app.kubernetes.io/instance: release-name
    app.kubernetes.io/version: "7.8.1"
data:
  startup.cfg: |
  hostname my-first-xrd
    username redhat
     group root-lr
     group cisco-support
     password redhat123
Now apply the configmap for XRd to use later:
$ oc apply -f .\configmap.yaml
configmap/xrd-control-plane-config created
Once the configmap is created, move on to the next which onboards XRd with desired number of interfaces.
Step 4: Onboard XRd Control Plane with Desired Interfaces
Now that the host environment has been prepared (performance profile, TuneD and MachineConfig), XRd tenant environment is created (namespace,service account and role binding) and a basic startup configuration has been defined, it's time to onboard your first XRd control plane instance.
To onboard the router, you will have to do the following:
- Define interfaces for the router by create a Network Attachment Definition (NAD)
- Instantiate an XRd Control Plane pod using statefulset
Step 4.1: Define Interfaces for your XRd Control Plane
By default, a Kubernetes Pod is provided with a single interface for management that is used by Kubenetes infrastructure to communicate with and access it. Being a router, however, XRd should have multiple interfaces to, you know, route traffic. To provide a pod with additional interfaces, a resource of type Network Attachment Definition has to be created.
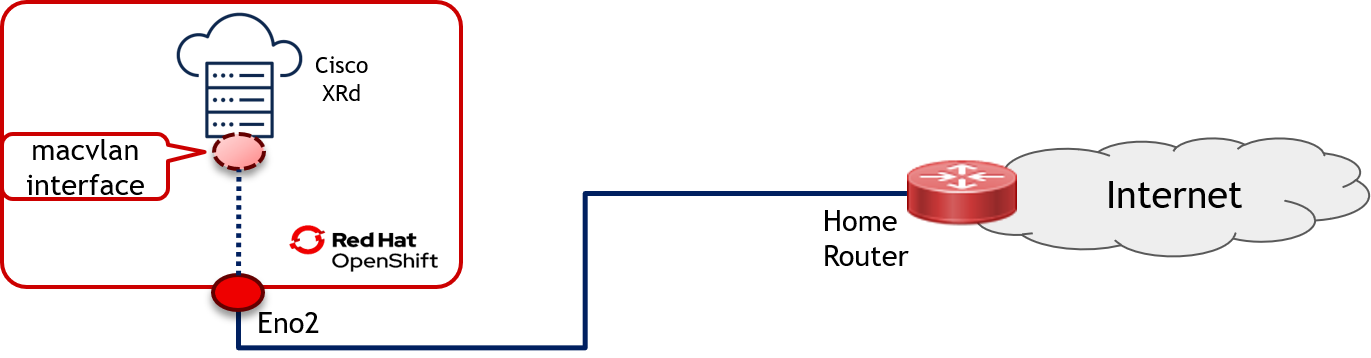
In the example below, a Network Attachment Definition is using a MACVLAN plugin and associate it with a physical interface - eno 2 in this case. This plugin allows a pod to define a virtual interface, allocating a unique mac address for it. The plugin can be configured in different modes, and in this case we use “bridge” mode as it allows the pods utilizing this plugin to create interfaces to communicate with each other as well as external devices connected via associated physical interface. More details on MACVLAN and other such plugins are available here:
Note that the the name of the physical interface may be different for other situations and you can use the following process to find physical interface names on your server:
$ oc debug nodes/kislam-sno1
(extra output omitted)
sh-4.4# sh-4.4# chroot /host
sh-5.1# ip -br a
lo               UNKNOWN        127.0.0.1/8 ::1/128
eno1             UP
eno2             UP    <<< We will use this interface.
eno3             DOWN
eno4             DOWN
The use of macvlan and its associate with physical interfaces for XRd using in this lab is shown in the figure below:
The following Network Attachement Definition manifest reflects the topology shown above.
Note: Its Important that you replace eno2 with your own interface in the manifest shown below
$  cat  nad.yaml
apiVersion: k8s.cni.cncf.io/v1
kind: NetworkAttachmentDefinition
metadata:
  name: macvlan-1
  namespace: xrd
spec:
  config: '{ "cniVersion": "0.3.1", "name": "macvlan-1", "type": "macvlan", "mode": "bridge", "master": "eno2", "ipam": { }}'
Here are some basic explanations of terms used in the manifest :
- Name: The name of the virtual interface
- Type: Virtual interfaces can be of various types, such as macvlan, ipvlan etc as covered above.
- Mode: Define the forwarding mode for the macvlan. We will use bridge mode as mentioned earlier
- Master: This is the physical interface used by macvlan interface as uplink
- IPAM: IP address Management is not being used in this case.
Now apply this manifest and verify the as shown below:
$ oc apply -f nad.yaml
networkattachmentdefinition.k8s.cni.cncf.io/macvlan-1 created

$ oc get network-attachment-definitions
NAME       AGE
macvlan-1   15s
Now you are ready to instantiate your first XRd pod.
Step 4.2: Deploy XRd using Statefulset
We will use a statefulset to instantiate the XRd Control Plane pod. The statefulset used here is shown below:
$ cat   statefulset.yaml
apiVersion: apps/v1
kind: StatefulSet
metadata:
  name: xrd-control-plane
  namespace: xrd
  annotations:
  labels:
    app.kubernetes.io/name: xrd-control-plane
    app.kubernetes.io/instance: release-name
    app.kubernetes.io/version: "7.8.1"
spec:
  replicas: 1
  serviceName: xrd-control-plane
  selector:
    matchLabels:
      app.kubernetes.io/name: xrd-control-plane
      app.kubernetes.io/instance: release-name
  template:
    metadata:
      annotations:
        k8s.v1.cni.cncf.io/networks: |-
          [
            {
              "name": "macvlan-1"
            }
          ]
      labels:
        app.kubernetes.io/name: xrd-control-plane
        app.kubernetes.io/instance: release-name
        app.kubernetes.io/version: "7.8.1"
    spec:
      serviceAccount: xrd-sa
      serviceAccountName: xrd-sa
      volumes:
      - name: config
        configMap:
          name: xrd-control-plane-config
          items:
            - key: startup.cfg
              path: startup.cfg
      containers:
      - image: "REACH OUT TO YOUR CISCO ACCOUNT TEAM"
        resources:
          limits: {}
          requests:
            memory: 2Gi
        name: main
        securityContext:
          privileged: true
        imagePullPolicy: Always
        tty: true
        stdin: true
        env:
        - name: XR_ENV_VARS_VERSION
          value: "1"
        - name: XR_FIRST_BOOT_CONFIG
          value: /etc/xrd/startup.cfg
        - name: XR_INTERFACES
          value: linux:net1,xr_name=GigabitEthernet0/0/0/0
        - name: XR_MGMT_INTERFACES
          value: ""
        volumeMounts:
        - mountPath: /etc/xrd
          name: config
          readOnly: true
Here is the brief overview of various values used in the manifest above:
- network name: using macvlan-1 as defined in nad.yaml
- serviceAccountName: using xrd-sa as defined in sa.yaml and assigned to proviedged role in role.yaml
- configMap name: using xrd-control-plane-config to be used as statutup config as defined in configmap.yaml
- Container image: This is the container image that should be download from the cisco.com and placed in a container image registry.
- Interfaces values: Once applied, the interfaces defined in network name are mapped to linux interface(s) that are in turn mapped to XRd router interface. An example of this mapping will be shown later after XRd control plane is instantiated.
Now apply the statefulset as shown below.
$ oc apply -f   statefulset.yaml
statefulset.apps/xrd-control-plane created
And thats it !!! Your XRd control plane pod is now running as shown below.
$ oc get pods
NAME                  READY   STATUS              RESTARTS   AGE
xrd-control-plane-0   1/1     Running   0          25s
To inspect the pod and its parameters you can use oc describe xrd-control-plane-0 command. You can also use the following command to see the association between macvlan-1, net1 and the XRd gig 0/0/0/0 interface using the following 2 commands
$ oc get pods xrd-control-plane-0 -ojsonpath='{.metadata.annotations.k8s\.v1\.cni\.cncf\.io\/network-status}'

[{
    "name": "ovn-kubernetes",
    "interface": "eth0",
    "ips": [
        "10.128.1.200"
    ],
    "mac": "0a:58:0a:80:01:c8",
    "default": true,
    "dns": {}
},{
    "name": "xrd/macvlan-1",
    "interface": "net1",
    "mac": "0e:f2:b4:ad:2d:83",
    "dns": {}
}]
$ oc get pods xrd-control-plane-0 -ojsonpath='{.spec.containers[].env}'
[{"name":"XR_ENV_VARS_VERSION","value":"1"},{"name":"XR_FIRST_BOOT_CONFIG","value":"/etc/xrd/startup.cfg"},
{"name":"XR_INTERFACES","value":"linux:net1,xr_name=GigabitEthernet0/0/0/0"},{"name":"XR_MGMT_INTERFACES"}]
Congratulations. You’ve instantiated your first Cisco XRd on Red Hat Openshift. Now its time to connect to your router and configure it.
Step 5: Connect to and configure your XRd Router
Just like any other pod, you can use the oc exec command to connect to XRd. The difference is that you can directly connect to the XR shell to run your beloved IOS-XR commands. Bear in mind that you will need the login credentials defined in the configmap.
Here is how to connect to the xr shell on the XRd container:
$ oc exec -it xrd-control-plane-0 -- xr

User Access Verification

Username: redhat
Password: redhat123

RP/0/RP0/CPU0:my-first-xrd#
Notice the hostname is already set, courtesy of the configmap defined in Step 3. Now that you are connected to the router, you can configure it just like an IOS-XR router. Lets verify that we have an interface associated with the router as defined in the statefulset and nad manifests.
RP/0/RP0/CPU0:my-first-xrd#sh ip int b
Interface                      IP-Address      Status          Protocol Vrf-Name
GigabitEthernet0/0/0/0         unassigned      Shutdown        Down     default
We will now use the following configuration to assign a static IP to this interface as well as a default route so that we can reach devices outside our local network.
RP/0/RP0/CPU0:my-first-xrd# conf t
RP/0/RP0/CPU0:my-first-xrd(config)#interface gigabitEthernet 0/0/0/0
RP/0/RP0/CPU0:my-first-xrd(config-if)#ipv4 address 192.168.86.231/24
RP/0/RP0/CPU0:my-first-xrd(config-if)#no shut

RP/0/RP0/CPU0:my-first-xrd(config-if)#router static
RP/0/RP0/CPU0:my-first-xrd(config-static)#address-family ipv4 unicast
RP/0/RP0/CPU0:my-first-xrd(config-static-afi)#0.0.0.0/0 192.168.86.1
RP/0/RP0/CPU0:my-first-xrd(config-static-afi)#commit
RP/0/RP0/CPU0:my-first-xrd(config)#end
You can now verify that the interface is up with the right IP address and ping the default gateway and other external devices. It must be noted that this ping is possible because of the macvlan interface defined in Network Attachment Definition in nad.yaml that is using eno2 as its uplink interface.
RP/0/RP0/CPU0:my-first-xrd#sh ip int br
Interface                      IP-Address      Status          Protocol Vrf-Name
GigabitEthernet0/0/0/0         192.168.86.231  Up              Up       default

RP/0/RP0/CPU0:my-first-xrd#ping 192.168.86.1
Type escape sequence to abort.
Sending 5, 100-byte ICMP Echos to 192.168.86.1 timeout is 2 seconds:
!!!!!
Success rate is 100 percent (5/5), round-trip min/avg/max = 2/4/14 ms

RP/0/RP0/CPU0:my-first-xrd#ping 8.8.8.8
Type escape sequence to abort.
Sending 5, 100-byte ICMP Echos to 8.8.8.8 timeout is 2 seconds:
!!!!!
Success rate is 100 percent (5/5), round-trip min/avg/max = 9/10/12 ms
Congratulations. Your XRd is now fully operational with an interface associated with it for external connectivity.
Git Resources and Using Kustomize to Run All Manifests at Once
All the files used in this blog are publically availble at our Git repository. This blog provides a full
Heres a tip: You can clone this git repo and use kutomization to apply ALL manifests at once as shown below:
Kustomization uses a kustomization.yaml file that describes all the
$ git clone  [email protected]:git-shassan/xrd-public.git
Cloning into 'xrd-public'...
remote: Enumerating objects: 18, done.
remote: Counting objects: 100% (18/18), done.
remote: Compressing objects: 100% (16/16), done.
remote: Total 18 (delta 2), reused 10 (delta 0), pack-reused 0
Receiving objects: 100% (18/18), 4.43 KiB | 1.48 MiB/s, done.

$ cd xrd-public/
$ ls -l
total 44
-rw-r--r-- 1 admin admin  427 Jul 23 03:23 configmap.yaml
-rw-r--r-- 1 admin admin  673 Jul 23 03:22 kustomization.yaml
-rw-r--r-- 1 admin admin  589 Jul 23 03:22 mc.yaml
-rw-r--r-- 1 admin admin  297 Jul 23 03:22 nad.yaml
-rw-r--r-- 1 admin admin  100 Jul 23 03:22 ns.yaml
-rw-r--r-- 1 admin admin  361 Jul 23 03:22 pao.yaml
-rw-r--r-- 1 admin admin   12 Jul 23 03:22 README.md
-rw-r--r-- 1 admin admin  288 Jul 23 03:22 role.yaml
-rw-r--r-- 1 admin admin  104 Jul 23 03:22 sa.yaml
-rw-r--r-- 1 admin admin 1685 Jul 23 03:22 statefulset.yaml
-rw-r--r-- 1 admin admin  851 Jul 23 03:22 tuned.yaml


$ oc apply -k .
The oc apply -k . command show above will run all the manifests that are listed in the Kustomization.yaml file. Currently the kustomization file shared on our git repo has the following manifests.
$ cat kustomization.yaml
apiVersion: kustomize.config.k8s.io/v1beta1
kind: Kustomization
# Change this namespace value if you want to use a different one than the default
namespace: xrd

resources:
# Configure performance profile. For OCP 4.12 and below, this PAO Operataor
- pao.yaml

# TuneD Operator for systemctl configs
- tuned.yaml

# Machine config
- mc.yaml

#Sets up the namespace for XRd
- ns.yaml

# Create a service account and Role Based Access for the account
- sa.yaml
- role.yaml

# Contain startup configuration for XRd - Currently, only a username
- configmap.yaml

# Stateful set to deploy XRd application
- nad.yaml

# Stateful set to deploy XRd application
- statefulset.yaml
Once this kustomization file is run all the tasks listed in this blog will be executed simultaneously and an XRd instance will be initiated on your OpenShift, provided that you have updated the statefulset.yaml with the correct XRd container image.
In a future blog, we will put together a simulated O-RAN xHaul Architectural topology using multiple XRd (and possibly other vendors’) containerized routers.