If you are reading this blog, you either already know why you want to run an LLM locally on your Mac, or at least curious about it. It's common knowledge that either a powerful CPU, or else GPUs. Mac built with the M-series chips, which is essentially all Macs sold since 2020, not only have powerful enough CPUs, but are also equipped with built-in GPU. So to answer the question asking if one can run LLM on M-series Macs with reasonable performance? The answer is : "Yes, you can".
But just because you can, should you do it? To begin with, by running the LLM locally, you are no longer bound with the challenge of running out of tokens, or looking at huge bills because the agentic workflow you were using used waaaaay more tokens than you had imagined it would need. The other obvious reason is running it locally means that it's as soverign as it can be!
Now that you know that you can easily run an LLM, and (hopefully) see a good enough reason to do that, the next question would be why do you need to look at a set of instructions do that. Installing a local model-runtime is not a daunting task - Ollama is one of the most popular choices, but there are quite a few other options like LMStudio, RamaLama, etc.. But installing them in your base machine implies that you don't have a good grip on the amount of resources they will be using. Next thing you will know is that your machine is hogged by a query that you sent towards your LLM, or a task you assigned to your local agent. Of course, there are multiple little knobs in each of these applications that could help you "fine tune" your resource allocation to some extent, but those might be complex to deal with and figure out what really works. So you would always need to be considerate about which model you should choose and how to make it run efficiently.
Containers to the rescue
Containers were essentially invented to run applications while limiting resource available to them, as well as ahcieve (limited) isolation. You can easily run containers on your Mac using various tools - I would recommend using "Podman Desktop". Lets get started there, and build our LLM hosting environment in a few simple and easy to follow steps....
A step by step guide
Step#1: Installing podman desktop
Podman-Deskop is easy and simple to install. The instructions are clearly documented on the official website , and there is no reason to duplicate it. So you can go ahead, install it as per the instructions, and move on to the next step here
Step#2: Preparing to run the container with GPU
Containers are a Linux concept - to be technically accurate, you can't really create containers directly on Mac OSX. Concepts that are foundational to "containerization" don't apply to Mac OSX. Podman-Desktop works around this limitation and runs containers on Mac OSX by literally creating a virtual machines, with Fedora running as the Host OS in the VM, and then runs the containers within this virtual machine environment. In case you are curious to take a peek inside this machine, you can use the "podman machine ssh" command to login to it as shown here:
% podman machine ssh
Connecting to vm podman-machine-default. To close connection, use `~.` or `exit`
Fedora CoreOS 43.20260316.3.1
Tracker: https://github.com/coreos/fedora-coreos-tracker
Discuss: https://discussion.fedoraproject.org/tag/coreos

Last login: Fri May  8 15:03:58 2026 from 192.168.127.1
root@localhost:~#
To run this VM, Podman uses Apple's Hypervisor (comes bundled with MacOS, starting from "Yosemite", and part of Apple's "Virtualization Framework"). That works well for regular containers, however this framework has one deficiency that makes it unsuitable for running LLM - it doesn't pass through the GPU to the VM and hence GPU is not available to the Containers created inside that VM either. An alternate option that Podman supports (starting version 5.2) and has available out of the box is "libkrun" to create the virtual machine. A Podman machine created using the flavor of "libkrun" provided in Podman can have GPU passthrough.
Whats libkrun?!
"libkrun" is an opensource library, to run processes in an isolated VM environment. You can think of it as a morph between the pros of Virtual Machine (full isolation) and the plus point of containers (lightweight, fast, and single application focused). Though it was originally developed for Linux environment to run with KVM, it was later adapted to work with MacOS's Hypervisor-framework to run on OSX as well. Unlike OSX's builtin "Virtualization Framework", that also runs on top of the "Hypervisor-framework", "libkrun" offers the ability to passthrough the GPU as well as other possibilities that were not available with the Virtualization-Framework. Essentially, you can think of it as running as a parallel alternative to "Virtualization Framework"
Just as a sub-side-note to this side-note, the default virtual machine by podman is initiated using a tool called vfkit thats installed behind the scenes, and is capable of interfacing with Apple's Virtualization Framework. But when launching a virtual machine using "libkrun", we want to bypass this framework and go directly to the underlying Hypervisor Framework. So there is another tool called krunxkit that gets installed under the hood when you install podman-desktop, and used by podman desktop to launch the VM using libkrun. You don't really need to interact with it as an end user.
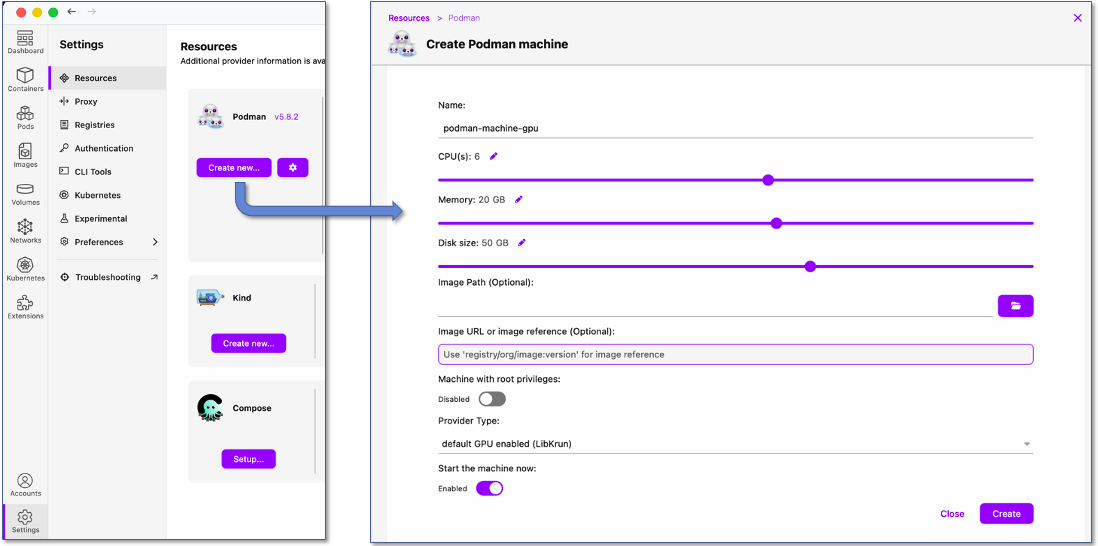
To create this Podman machine, go to the Podman menu Settings --> Resources. You will see the default machine configuration there. Though its not required to remove this machine, you can either stop+erase it , or completely erase it. Note that you can't keep this (default) machine running, as only one Podman Machine (i.e. only one Virtual Machine) is all that Podman allows. Then create a new machine, as shown in the figure below. You don't really need to give it too many CPUs, but since I intend to use this machine for other containers as well (that would require CPU), I am giving it a few extras. Whats more critical is how much memory you give to it, as this field will limit the model you are able to run, and its performance.
If you create this new machine without deleting (i.e. just stopping) the default Podman machine that uses Apple Hypervisor, you will receive a warning saying:
"Podman Machine 'podman-machine-gpu' is running but not the default machine (default is 'podman-machine-default'). This will cause podman CLI errors while trying to connect to 'podman-machine-gpu'. Do you want to set it as default?".
To avoid confusion, just like the message says, choose "yes" to make this machine the default machine that Podman CLI interacts with.
The following figure shows what your "Resource" screen should show at this stage. Notice that the GPU machine is the only one running and also is the default machine that Podman will use when creating containers, downloading images etc.
If you want to explore a bit more about this machine, you can run podman commands from Terminal window to see the machine, dump its information, and also ssh to it, as shown here:
 % podman machine ls
NAME                 VM TYPE     CREATED         LAST UP            CPUS        MEMORY      DISK SIZE
podman-machine-gpu*  libkrun     24 minutes ago  Currently running  6           18.63GiB    46GiB
You can also verify that GPU device is indeed made available to this machine by logging into it (ssh) and then running ls /dev/dri, as shown below. The presence of render* confirms that GPU was indeed passed to the VM
% podman machine ssh podman-machine-gpu
Connecting to vm podman-machine-gpu. To close connection, use `~.` or `exit`
Fedora CoreOS 43.20260316.3.1
Tracker: https://github.com/coreos/fedora-coreos-tracker
Discuss: https://discussion.fedoraproject.org/tag/coreos

core@localhost:~$ ls /dev/dri/
by-path  card0  renderD128
core@localhost:~$
Step#3: Building and Launching your container
Now that the VM with GPU is in place, we can launch a container with the model-runtime and model, and expose the appropriate port for external access. Though there are containerized versions of the above mentioned model-runtimes already available on public container registries, we can't directly run them as-is (at least not every flavour of them). That's because the in order to use the GPU resource from the virtual machine, certain drivers need to be used in Linux. Specifically, these are the . These libraries, developed as part of an OpenGL project called MESA perform the magic of allowing the container's OS to use the GPU available to it in the Host machine (which happens to be the Podman Machine we created in the previous step). You can look for a version of your favourite model-runtime that is built with "vulkan" drivers, or build one yourself.
For the purpose of this blog, I have chosen the barebones llama.cpp binaries as there is no need to run fancy GUI to be part of my primary inference container (as would have been the case with Ollama or LiteLLM) and focuses its resources simply for inference and LLM interface. There is a version of llama.cpp docker container that is supposedly compiled with Vulkan drivers, but it seems to not work smoothly. So its best to build your own docker. In case this sounds intimidating, the steps are amazingly simple.
If you want, you can completely skip this step and jump to Step#4. In that case, you can simply use a prebuilt image in that step
Start by creating the following file in any accessible location on your mac:
cat << EOF > Containerfile
FROM fedora:44
LABEL description="A simple container to run llm on mac using podman-desktop"
MAINTAINER Syed Hassan
USER 0
RUN dnf -y install wget mesa-vulkan-drivers vulkan-loader-devel vulkan-headers vulkan-tools vulkan-loader glslc llvm19-libs-19.1.7-18.fc44.aarch64
RUN dnf -y copr enable slp/mesa-krunkit epel-9-aarch64 && dnf -y downgrade mesa-vulkan-drivers.aarch64 --repo=copr:copr.fedorainfracloud.org:slp:mesa-krunkit && dnf clean all && rm -rf /var/cache/dnf
# for the following, pick newer version if desired from: https://github.com/ggml-org/llama.cpp/releases
RUN wget https://github.com/ggml-org/llama.cpp/releases/download/b9637/llama-b9637-bin-ubuntu-vulkan-arm64.tar.gz -O /llama-cpp.tar.gz && mkdir /llama-cpp && tar -xvf /llama-cpp.tar.gz -C /llama-cpp --strip-components=1 && rm -f /llama-cpp.tar.gz
EXPOSE 8080
ENTRYPOINT ["/llama-cpp/llama-server"]
# CMD ["-hf", "ggml-org/gemma-4-26B-A4B-it-GGUF"]
EOF
Now build this container image using the following command:
podman build -t my-llm .
Advanced Users
There are two things worth mentioning here for advanced users:
The Container image being built here is using Fedora:44 as the base, which is the latest available option at the time of this writing. You can use a more recent version if avaialble. Similarly, the drivers can be updated, but make sure to test it out if the new combination works for GPU utilization.
The container installs llama.cpp's latest build available at the time of this writing. You can pick a more recent build by looking up the llama.cpp releases page. Make sure to pick an image with vulkan.
Once you run the podman build command, you should see output such as the following:
% podman build -t my-llm ~/Documents/
STEP 1/8: FROM quay.io/slopezpa/fedora-vgpu
STEP 2/8: LABEL description="A simple container to run llm on mac using podman-desktop"
--> ff4c23b758a0
STEP 3/8: MAINTAINER Syed Hassan
--> 20c96412ffc2
STEP 4/8: USER 0
--> e910ce9e8e1c
STEP 5/8: RUN dnf -y install wget

..... SNIPPED ....

STEP 8/8: ENTRYPOINT ["/llama-cpp/llama-server"]
COMMIT my-llm
--> eaa422ff6c39
Successfully tagged localhost/my-llm:latest
eaa422ff6c39fda53b212042b7b4f4f954ac1a539f6b05f9f3b382d41cea551d
You can now verify that the image was successfully built and available, as shown here:
% podman images
REPOSITORY                           TAG          IMAGE ID      CREATED        SIZE
localhost/my-llm                     latest       eaa422ff6c39  5 seconds ago  898 MB
Step#4: Lets run it!
Now that the image has been created, its a simple matter of running it. Like the previous step, this too has to be done using the terminal window and podman command line. That's because the GPU needs to be made available to the container (using "--device" option of the CLI) and there isn't an equivalent of that in the Podman GUI. However, running the container is a piece of cake, just use the command shown below:
Prior to launching the container, let us create two specific folders for storing our models. This is not required, but it will save you time (and bandwidth) if you end up destroying+recreating the model at a later time. The two folders being created are for:
./llama_cache : this is mapped to the container folder that llama.cpp will use to store any model it downloads from a source (such as Huggingface). Offering this persistent storage will save re-download of the model files if Container is recreated
./llama_models : this is mapped to the container folder that is provided to llama.cpp as a folder containing model files. Note that the files need to be in the GGUF format, and in case there are multiple GGUF files for a model, then those need to be grouped togetehr in a subdirectory under ./llama_models
mkdir {./llama_cpp,./llama_models}
One more step that we will do prior to creating the container is creation a dedicated podman network that this conatainer shall use. Why shall we do that, one may ask. Realistically, we don't need that dedicated Podman network, but by creating this network we can use it for other AI tools that might get created later (especially Model Context Protocol, or MCP, servers) , and allow those tools to use DNS lookup to reach the LLM container we are creating here. Additionally, we can limit the exposure of our moderl runtime to limit it from ever reaching the internet or other containers. Folliowing snippet can be used to create this Podman network:
podman network create ai_net --opt isolate=true
Note that the above command doesn't stop the containers on this network from reaching to external networks and internet. If thats desired, then use the --internal flag as well. This will, however, mean that neither the LLM, nor the other containers on ai_net Podman-network can reach the internet. You may not desire that behaviour.
Now that everything is in place, lets go ahead and lauch our primary container:
The container is being run in a daemon mode, so it will keep running in the background
The devices under "/dev/dri" are being passed to the container. This is what enables the GPU passthrough
This container is using the newly created "ai_net" podman network, as discused earlier.
Port 8080 of the container is being mapped to the same port number on your Mac. You can use a different port for the Mac if needed. For example, if 8181 is desired, then use "-p 127.0.0.1:8181:8080" instead
On the host machine (your Mac!) we are only listening on 127.0.0.1. You wouldn't want to open up the port on your public interface(s) since that creats the possibility of reverse proxy attack using your LLM container.
The flags "--ui" and "--ui-mcp-proxy" are being passed to the container command line. These end up being passed to the llama.cpp-server that runs inside this container. the "--ui" flag is default option, and enables the availability of llama.cpp web UI which you will find useful later on. The "--ui-mcp-proxy" option is not default enabled, but by using this flag and passing it to llama.cpp-server you are enabling Cross Origin Resource Sharing (CORS) capability. That becomes really important if you use the Web UI for talking to your MCP servers (and trust me, thats a feature you will definitely want to use). To learn more about CORS, you can check out this page
the model "ggml-org/gemma-4-E2B-it-GGUF" is being loaded here as the LLM to be used. You can certainly use a different model too, the container allows for that flexibility. However, since llama.cpp requires the model to be in the GGUF file format, the model to be used can't be in other formats such as "safetensors". If you, however, want to use a model thats not available in "GGUF" format, llama.cpp provides a tool that can convert from "safetensors" to "GGUF" format. Details of that beyond the scope of this blog. You can find a lot of other GGUF models available on ggml's official repository on Huggingface.
This last portion of downloading the model from huggingface can be skipped if you have previously downloaded and stored a model (in GGUF format) in the ./llama_models directory. Or you could do both. The server will give you the option to choose the appropriate model when you run a query.
There are a number of other command line flags that you can explore and use. Refer to llama.cpp documentation for a complete list.
Step#5: Verifying your container's state
Once you launch the container, you shall look up its logs to ensure that the GPU is indeed being made available to the llama.cpp application. Use either the "podman logs" command to see the logs, or you can use the GUI to see the logs of the running container:
% podman logs myllm

load_backend: loaded RPC backend from /llama-cpp/libggml-rpc.so
load_backend: loaded Vulkan backend from /llama-cpp/libggml-vulkan.so
load_backend: loaded CPU backend from /llama-cpp/libggml-cpu-armv8.2_2.so

--- SNIP ---

llama_model_loader: loaded meta data with 44 key-value pairs and 601 tensors from /root/.cache/huggingface/hub/models--ggml-org--gemma-4-E2B-it-GGUF/snapshots/a1dac71d3ab220618f5a7573a52acdc4baf3ae3b/gemma-4-E2B-it-Q8_0.gguf (version GGUF V3 (latest))
llama_model_loader: Dumping metadata keys/values. Note: KV overrides do not apply in this output.
llama_model_loader: - kv   0:                       general.architecture str              = gemma4
llama_model_loader: - kv   1:                               general.type str              = model
llama_model_loader: - kv   2:                     general.sampling.top_k i32              = 64

--- SNIP ---

llama_prepare_model_devices: using device Vulkan0 (Virtio-GPU Venus (Apple M1 Max)) (unknown id) - 32768 MiB free

--- SNIP ---
Step#6: Accessing your LLM
Your LLM is now available to you! You can interact with it using OpenAI defined REST API calls (using curl, for example), or point your Code assistant to it, or install a GUI client as well. Following are a few examples of REST API calls that you can use:
curl http://127.0.0.1:8080/models | jq
curl http://127.0.0.1:8080/chat/completions -H 'Content-Type: application/json' -d '{ "model": "ggml-org/gemma-4-E2B-it-GGUF", "messages": [ {"role": "user","content": "tell me about yourself and your capabilities" }]}' | jq
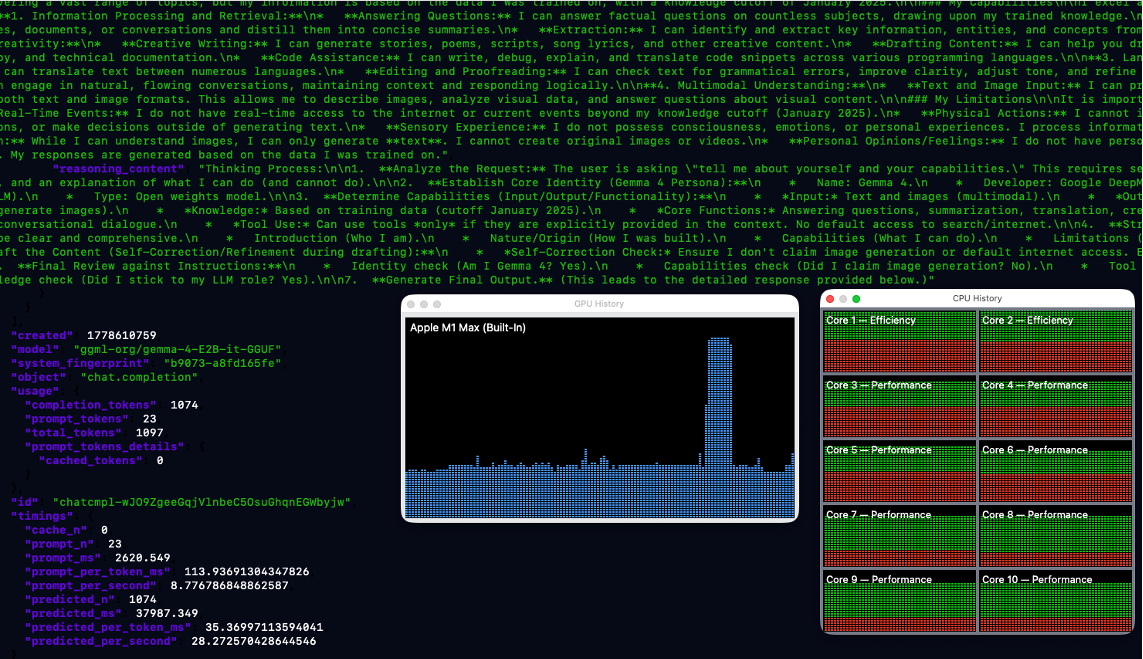
I will encourage you to take a look at your CPU and GPU usage on your Mac as you run the above commands. You can open the Activity Monitor and press CMD+4 and CMD+3 to popup the window for CPU and GPU usage history. You will notice that the GPU usage spikes up, while CPU stays unchanged as the LLM's response is being generated.
An example output of these commands is being shared here:
%  curl http://127.0.0.1:8080/models  | jq
  % Total    % Received % Xferd  Average Speed   Time    Time     Time  Current
                                 Dload  Upload   Total   Spent    Left  Speed
100   643  100   643    0     0  32412      0 --:--:-- --:--:-- --:--:-- 33842
{
  "models": [
    {
      "name": "ggml-org/gemma-4-E2B-it-GGUF",
      "model": "ggml-org/gemma-4-E2B-it-GGUF",
      "modified_at": "",
      "size": "",
      "digest": "",
      "type": "model",
      "description": "",
      "tags": [
        ""
      ],
      "capabilities": [
        "completion",
        "multimodal"
      ],
      "parameters": "",
      "details": {
        "parent_model": "",
        "format": "gguf",
        "family": "",
        "families": [
          ""
        ],
        "parameter_size": "",
        "quantization_level": ""
      }
    }
  ],
  "object": "list",
  "data": [
    {
      "id": "ggml-org/gemma-4-E2B-it-GGUF",
      "aliases": [
        "ggml-org/gemma-4-E2B-it-GGUF"
      ],
      "tags": [],
      "object": "model",
      "created": 1778610650,
      "owned_by": "llamacpp",
      "meta": {
        "vocab_type": 2,
        "n_vocab": 262144,
        "n_ctx_train": 131072,
        "n_embd": 1536,
        "n_params": 4647450147,
        "size": 4951677068
      }
    }
  ]
}


%  curl http://127.0.0.1:8080/chat/completions -H 'Content-Type: application/json' -d '{ "model": "ggml-org/gemma-4-E2B-it-GGUF", "messages": [ {
"role": "user","content": "tell me about yourself and your capabilities" }]}'  | jq

  % Total    % Received % Xferd  Average Speed   Time    Time     Time  Current
                                 Dload  Upload   Total   Spent    Left  Speed
100  5578  100  5443  100   135    133      3  0:00:45  0:00:40  0:00:05  1210
{
  "choices": [
    {
      "finish_reason": "stop",
      "index": 0,
      "message": {
        "role": "assistant",
        "content": "I am Gemma 4, a Large Language Model developed by Google DeepMind. I am an open weights model, meaning my architecture and parameters are available for

-- SNIP --

      }
    }
  ],
  "created": 1778610759,
  "model": "ggml-org/gemma-4-E2B-it-GGUF",
  "system_fingerprint": "b9073-a8fd165fe",
  "object": "chat.completion",
  "usage": {
    "completion_tokens": 1074,
    "prompt_tokens": 23,
    "total_tokens": 1097,
    "prompt_tokens_details": {
      "cached_tokens": 0
    }
  },
  "id": "chatcmpl-wJO9ZgeeGqjVlnbeC5OsuGhqnEGWbyjw",
  "timings": {
    "cache_n": 0,
    "prompt_n": 23,
    "prompt_ms": 2620.549,
    "prompt_per_token_ms": 113.93691304347826,
    "prompt_per_second": 8.776786848862587,
    "predicted_n": 1074,
    "predicted_ms": 37987.349,
    "predicted_per_token_ms": 35.36997113594041,
    "predicted_per_second": 28.272570428644546
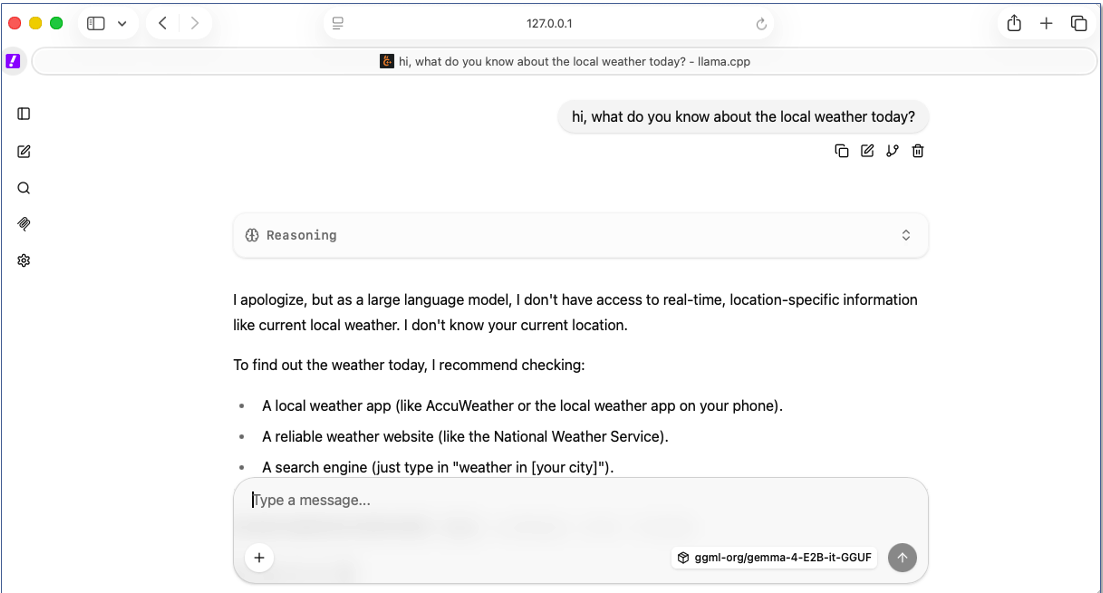
llama.cpp provides a simple GUI as well, which can be accessed by pointing your browser to the port 8080 on local machine, like shown here:
If you would like to connect your VSCode with this locally running LLM, and get Cursor-like environment, checkout this blog post.

 If you would like to connect your VSCode with this locally running LLM, and get Cursor-like environment, checkout this blog post.